[How To] How to Adjust Fan Speed in MSI System Management Software
Answer
Your MSI notebook automatically adjusts fan speed based on system load to maintain appropriate cooling performance. If you want stronger cooling during gaming or demanding workloads, or prefer quieter fan operation during light use, you can manually configure the fan settings through the pre-installed system management software. This guide will help you locate the relevant settings and explains when each fan mode is most suitable.
Applicable to MSI notebooks equipped with MSI Center, MSI Dragon Center, MSI Center Pro, or other MSI system management software
To optimize cooling performance or reduce fan noise, you can adjust fan speed through the system management software pre-installed on your MSI notebook (MSI Center / MSI Dragon Center / MSI Center Pro, etc., depending on your notebook model).
Step 1: Locate the Fan Speed Adjustment Menu
Open the MSI system management software pre-installed on your notebook
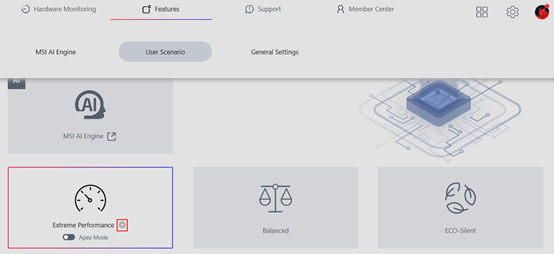
Navigate to: User Scenario → Extreme Performance → click the gear icon on that mode to enter Advanced Settings → Advanced
The menu names may vary slightly depending on the software version, such as「User Scenario」or「Apex Mode」. Look for a setting labeled with「Fan Speed」to locate the correct option.
Step 2: Select the Appropriate Fan Mode
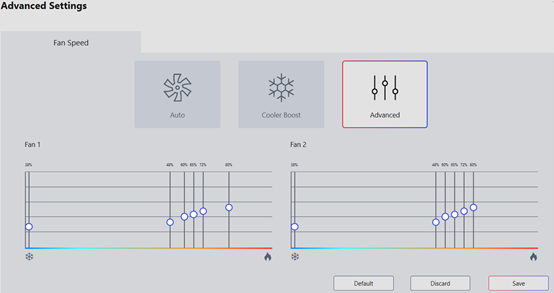
Once inside the fan settings, you will typically see the following modes available:
Auto: The system automatically controls fan speed based on temperature
Cooler Boost: Allows the fans to run at full speed for a short period, ideal for gaming or high-load tasks that require maximum cooling, or for quickly lowering temperature
Advanced: Allows you to manually adjust the fan speed for different temperature ranges according to your needs
If the「Advanced」option does not appear in your software, your notebook model may not support custom fan curves. This is a hardware specification limitation and not a software issue.
If you select a custom fan curve under「Advanced」, follow the on-screen instructions to drag and set the percentage values. The number of curve nodes and percentage range will vary by model — please refer to what is actually displayed on your software screen.
Once finished, be sure to click「Save」to confirm your changes.
Notes
Not all models are equipped with separate CPU and GPU fans. Some models use a single fan to cool both components, in which case the system management software may only display one adjustable fan speed setting.
Do not set all fan speed stages to 0%. Excessively high system temperatures may damage the chip and motherboard. To prevent damage caused by improper settings, the fan will automatically resume operation if the system detects that the temperature has exceeded a safe threshold.
If the fan does not operate according to your settings after adjustment, possible causes include:|
Your model is older and does not support the current software version's features
The configured value exceeds the safe range for your model
Frequent changes to the settings have caused the system to misinterpret the configuration
If any of the above occurs, restart your computer and try adjusting the settings again.
FAQ
Q: Which is better — Auto mode or a custom fan curve?
A: In most cases, Auto mode is sufficient for everyday use, as the system intelligently adjusts fan speed based on actual temperature. If you perform high-load tasks (such as gaming or rendering) and have specific requirements for fan noise or cooling performance, you may consider using a custom fan curve for finer control.
Q: Is it normal for fan noise to increase after using Cooler Boost?
A: Yes, this is normal. Cooler Boost instantly increases fan speed to the maximum level to achieve optimal cooling performance, resulting in noticeably louder fan noise compared to normal modes.