[How To] Set Up Virtualization on Your MSI Notebook to Run Virtual Machines
Answer
If you need to use VMware Workstation, Oracle VirtualBox, Microsoft Hyper-V, Windows Sandbox, Android Emulator, or other virtualization software, your system requires both CPU virtualization support and a compatible Windows virtualization environment.
MSI notebooks typically have CPU virtualization enabled by default in BIOS. However, Windows security features, such as Virtualization-Based Security (VBS), Memory Integrity, and Hyper-V, may prevent third-party virtualization software from accessing the hardware virtualization resources.
This article explains how to verify your BIOS virtualization settings, check the Windows virtualization status, and adjust the related settings when necessary.
This article applies to MSI notebooks that support CPU virtualization
Step 1: Confirm CPU Virtualization Is Enabled in BIOS
Confirm that the CPU virtualization option is enabled in BIOS.
If you cannot find the virtualization option, first verify that your processor supports Intel VT-x/VT-d. Refer to [Product Information] Intel Virtualization Technology Support.
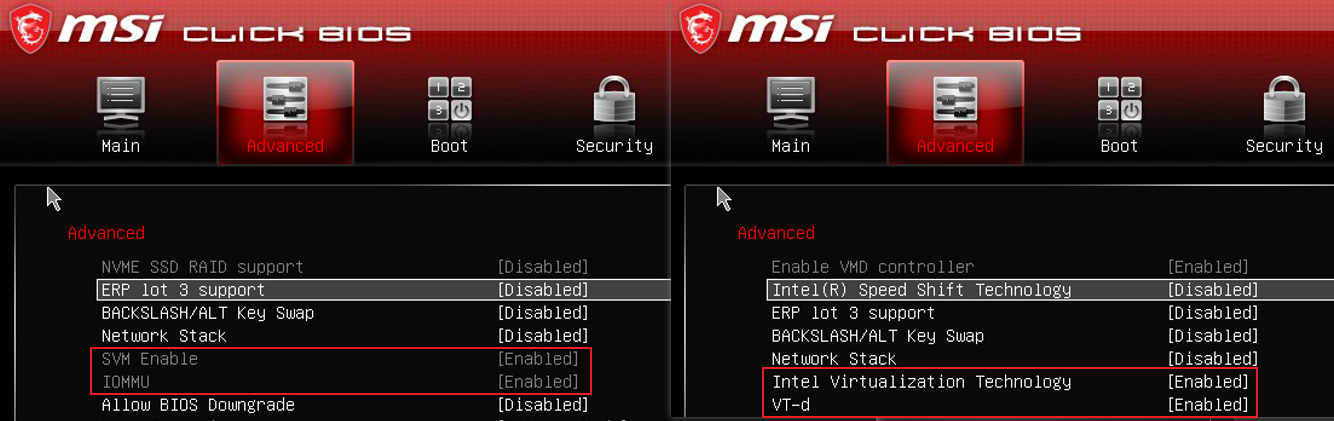
Intel platform BIOS path:
Advanced → Intel Virtualization Technology & VT-d
AMD platform BIOS path:
Advanced → SVM & IOMMU
If the option is set to Disabled, change it to Enabled, then press F10 to save the settings and restart the system.
Step 2: Check the Windows Virtualization Status
Press the Windows key, type msinfo32, and open System Information.
Check the following items:
1. If Virtualization-based security shows Running, Virtualization-Based Security (VBS) is currently enabled.
2. If the following message appears, another Windows virtualization mechanism is already using the CPU virtualization resources.
A hypervisor has been detected. Features required for Hyper-V will not be displayed.
If either condition is present, Windows virtualization features may interfere with VMware Workstation, Oracle VirtualBox, or other third-party virtualization software. Continue to Step 4.

Step 3: Verify CPU Virtualization Capability with Coreinfo
1. Download the Coreinfo tool from Microsoft Sysinternals and extract the files.
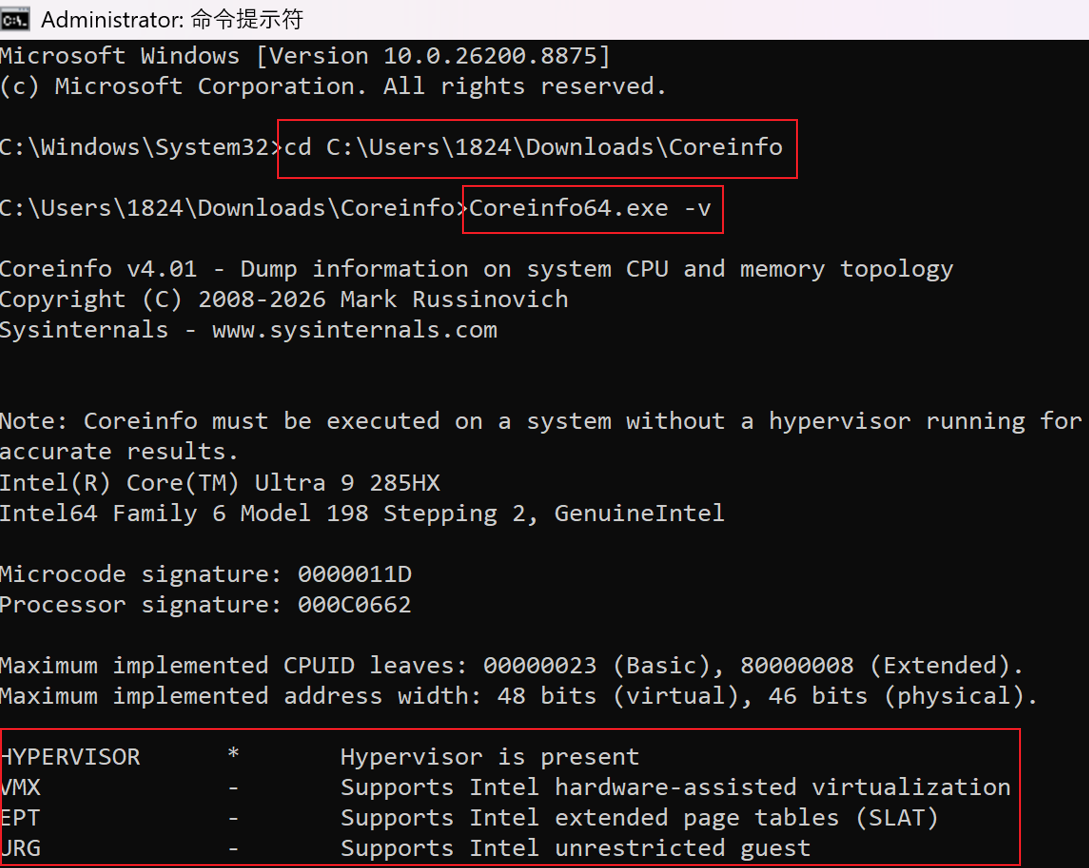
2. Open Command Prompt as Administrator. Navigate to the extracted folder.
3. Run "Coreinfo64.exe -v".
4. Check the following entries:
VMX — Indicates whether Intel VT-x is available.
EPT — Indicates whether Extended Page Tables (EPT) are available.
If the value is " * ", the feature is supported and active.
If the value is " - ", the feature is unavailable or currently occupied.
Note
If the output shows: HYPERVISOR * Hypervisor is present, another virtualization mechanism is already running. As a result, VMX and EPT may display " - ", even though the processor supports these features.
This does not indicate that the processor lacks virtualization support. Instead, the Windows Hypervisor is already using the virtualization resources.
Complete Step 4 first, then repeat this verification.
Step 4: Adjust Windows Virtualization Features (Standard Method)
If BIOS and Windows both confirm that virtualization is enabled, but your virtualization software still cannot use hardware virtualization, adjust the following Windows features.
1. Disable Memory Integrity.
a. Search for Core Isolation.
b. Turn Memory Integrity off.
2. Disable Windows optional virtualization features.
a. Search for Turn Windows features on or off.
b. Clear the following options:
Virtual Machine Platform
Windows Hypervisor Platform
Restart the computer, launch your virtualization software again and verify whether the issue has been resolved.
Step 5: Force Disable VBS and Hyper-V (Advanced Method)
Security Notice:
Disabling VBS, Memory Integrity, and Hyper-V removes several Windows security protections, including Credential Guard and Memory Integrity protection. It also affects Windows features that rely on the Windows Hypervisor, such as Windows Sandbox and WSL2.
Use this method only if Step 4 does not resolve the issue.
After troubleshooting, re-enable these features if you no longer require long-term virtualization software compatibility.
Disable VBS
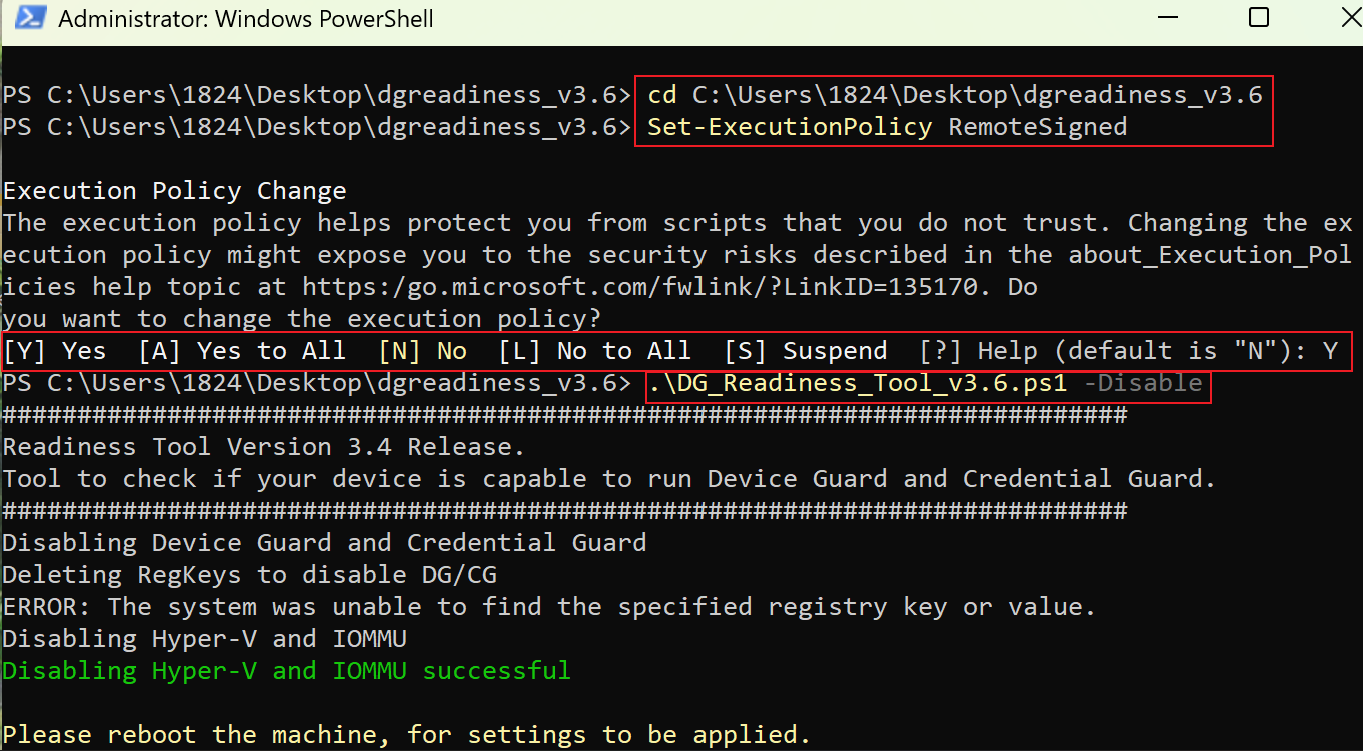
1. Download the Microsoft DG Readiness Tool.
2. Open PowerShell as Administrator.
3. Run "Set-ExecutionPolicy RemoteSigned".
4. When prompted, type "Y" and press Enter.
5. Navigate to the folder containing the DG Readiness Tool.
6. Run ".\DG_Readiness_Tool_v3.6.ps1 -Disable".
7. Restart the computer.
Restore VBS
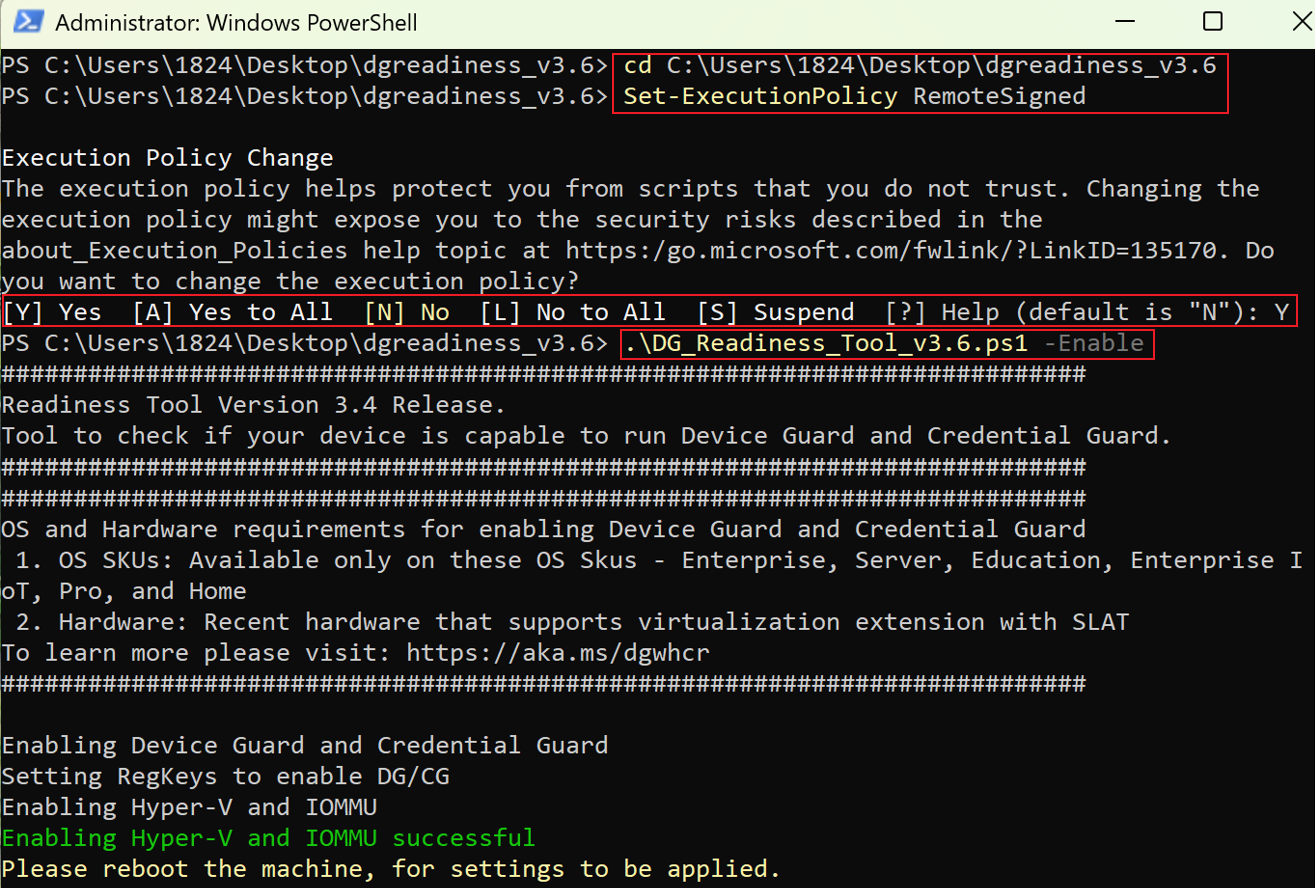
1. Repeat the steps above.
2. Run ".\DG_Readiness_Tool_v3.6.ps1 -Enable".
3. Restart the computer.
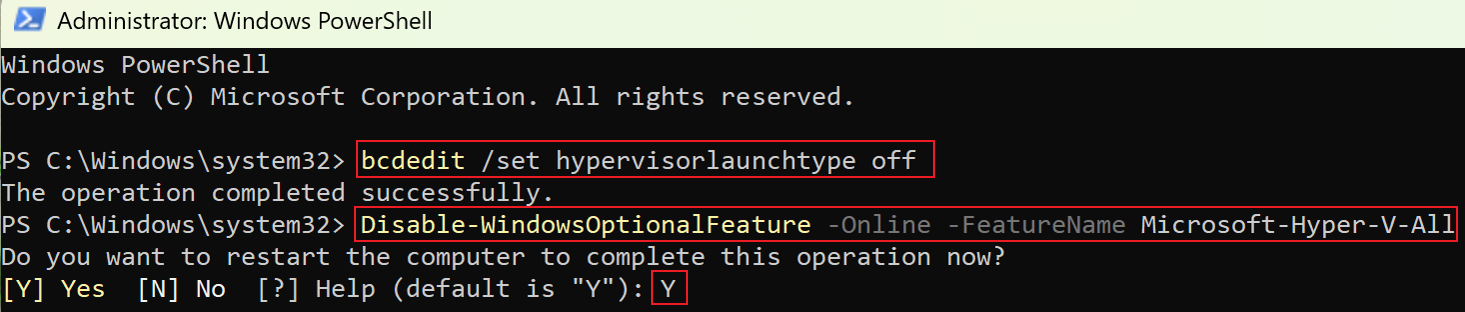
Disable Hyper-V
1. Open PowerShell as Administrator.
2. Run "bcdedit /set hypervisorlaunchtype off".
3. Run "Disable-WindowsOptionalFeature -Online -FeatureName Microsoft-Hyper-V-All".
4. Restart the computer.
Restore Hyper-V
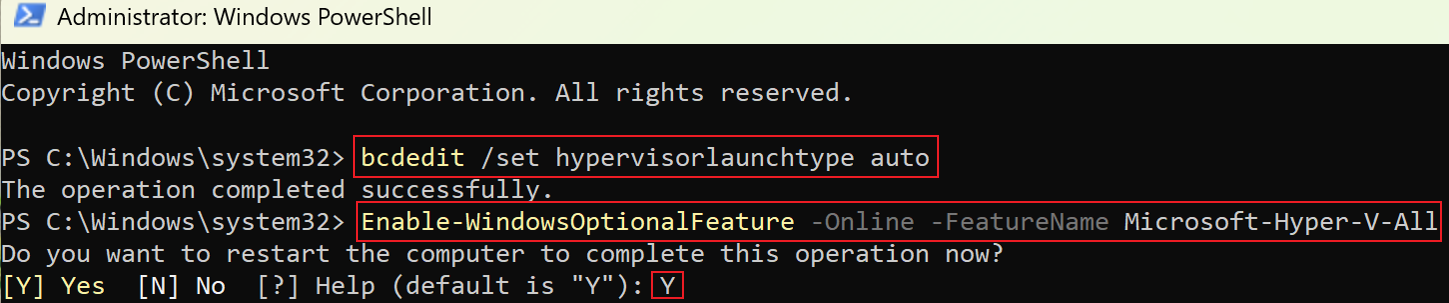
1. Open PowerShell as Administrator.
2. Run "bcdedit /set hypervisorlaunchtype auto".
3. Run "Enable-WindowsOptionalFeature -Online -FeatureName Microsoft-Hyper-V-All".
4. Restart the computer.
Verify the Result
After restarting, verify the following items.
1. CPU virtualization is enabled in BIOS.
2. Open System Information (msinfo32) and locate the Hyper-V Requirements section.
Verify that the following items all display Yes:
Hyper-V - VM Monitor Mode Extensions
Hyper-V - Second Level Address Translation Extensions
Hyper-V - Virtualization Enabled in Firmware
Hyper-V - Data Execution Prevention Available
These results indicate that CPU virtualization is available to Windows and is no longer occupied by another hypervisor.
3. Verify that VMware Workstation, Oracle VirtualBox, or other virtualization software can successfully create and start a virtual machine.
4. Confirm that VT-x, AMD-V, or Hypervisor-related error messages no longer appear.
FAQ
Q: BIOS has VT-x enabled. Why does VMware still report that hardware virtualization is unavailable?
A: When Hyper-V, Virtualization-Based Security (VBS), or Memory Integrity is enabled, the Windows Hypervisor reserves the CPU virtualization resources. This may prevent third-party virtualization software from directly accessing hardware virtualization. Refer to Step 4 and Step 5 to adjust these settings.
Q: Does disabling Hyper-V or VBS affect Windows security?
A: Yes. These features are associated with Windows security technologies, including Windows Sandbox, WSL2, Credential Guard, and Memory Integrity. Disabling them reduces the system's security protection. Re-enable these features after troubleshooting if they are no longer required.
Q: Do Intel and AMD platforms follow the same process?
A: Yes. The troubleshooting process is generally the same.
The primary difference is the BIOS option name:
Intel platforms: Intel Virtualization Technology (VT-x)
AMD platforms: Secure Virtual Machine (SVM)
Q: Do I need to manually enable URG?
A: No. URG is a processor hardware capability rather than a BIOS option. If the processor supports URG, it is available automatically. No manual configuration is required.