[Gaming Master] Find the Best Gaming Settings for MSI Claw Series Handhelds
Answer
If you want to get better gaming performance and a smoother gaming experience on your MSI Claw series handheld, follow the recommendations in this article. By completing the software updates, performance optimization, Windows 11 feature adjustments, and in-game display settings step by step, you can find the settings combination that best suits your gaming needs.
This article applies to MSI Claw series handhelds
A. Keep Your Software Up to Date
Make sure the handheld is connected to the Internet.
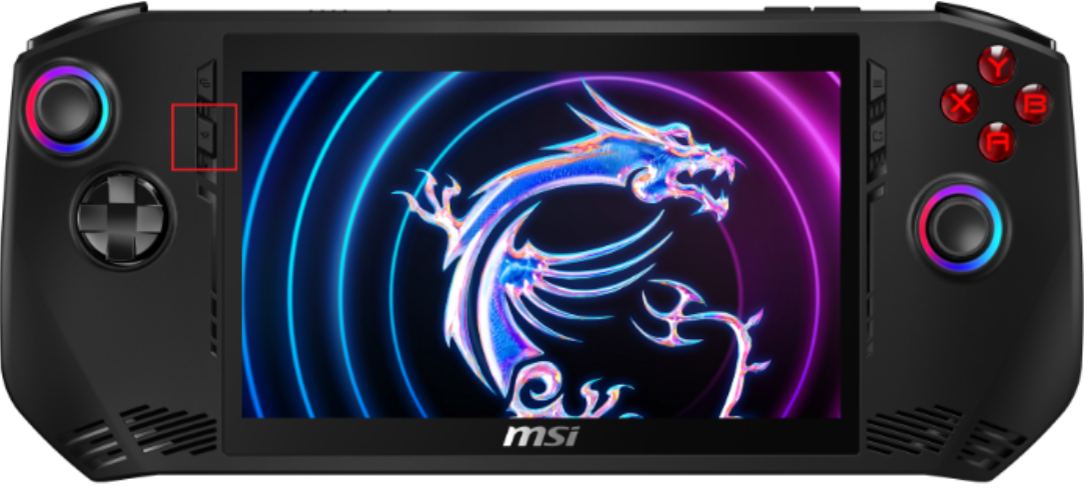
1. Press the “MSI button”, or open MSI Center M from the system tray.
2. Go to “News and Updates” and click “Scan” to check for available updates.
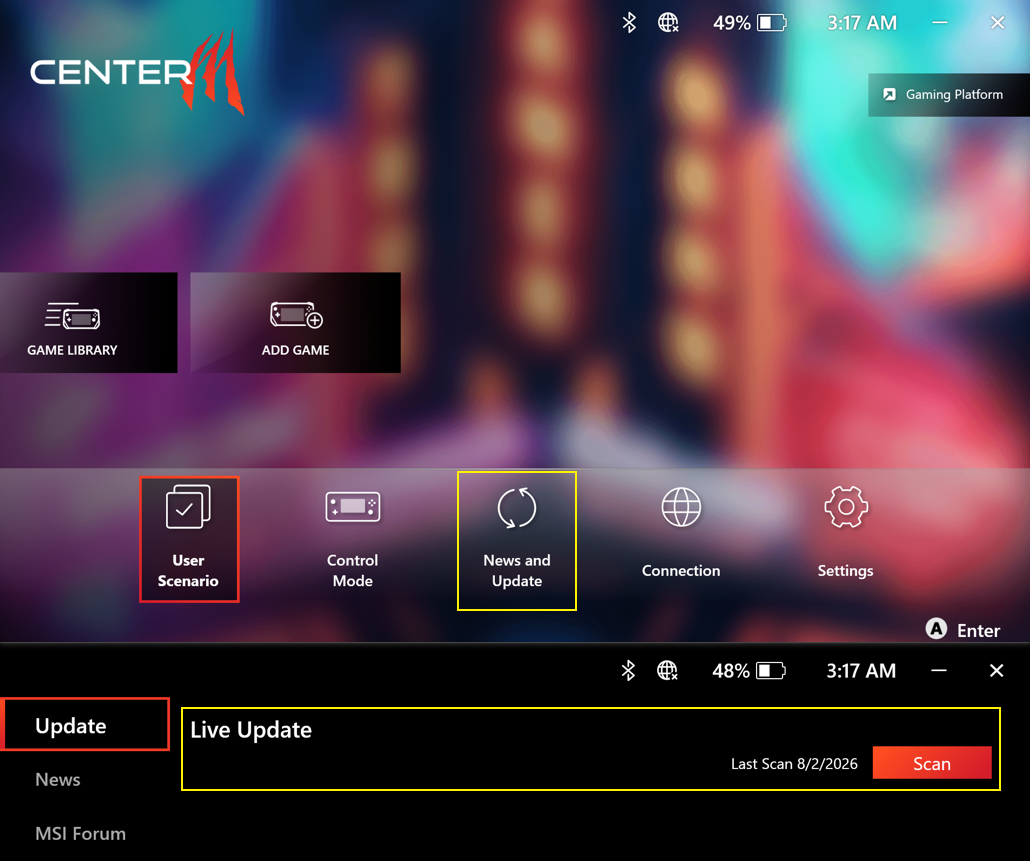
3. Install the latest drivers and BIOS firmware from the update list.
B. Apply Performance Optimization Settings
1. Open MSI Center M and set the User Scenario to “Balanced”.
If you have previously changed the default scenario, you can restore the setting through the “Quick Settings” button or the User Scenario page in MSI Center M.
2. Right-click the battery icon in the system tray and select “Power & sleep settings”. Keep the Windows 11 power mode set to “Balanced”.
C. Adjust Windows 11 Features
Certain Windows 11 features, including “Memory integrity” and “Virtual Machine Platform”, may reduce gaming performance or result in lower FPS in some games. These features are part of the security protections provided by Windows 11 and are not an indication of a hardware problem.
For security reasons, these features are enabled by default on new Windows 11 installations. For users who prioritize gaming performance, these features can be temporarily disabled while gaming to improve performance.
Turn Off Memory Integrity
1. Enter “Core isolation” in the Windows search box and open the corresponding system settings page.
2. Turn off the “Memory integrity” switch, then restart the system for the change to take effect.
Turn Off Virtual Machine Platform (VMP)
1. Enter “Turn Windows features on or off” in the Windows search box and open the corresponding settings page.
2. Clear the “Virtual Machine Platform” checkbox, click “OK”, and then restart the system for the change to take effect.
Note:
Disabling these features reduces the system's security protection level. We recommend disabling them only while gaming and exercising caution when running files from unknown sources.
D. Find the Best In-Game Display Settings
Different games place different levels of load on the GPU, so there is no single set of settings that works best for every game and scenario. The following steps start with basic adjustments and gradually move to more advanced settings, helping you find the right balance between image quality and gaming performance.
1. Visit the “Recommended Game Settings for Claw” page and apply the official recommended settings for your game. This is the easiest way to get started.
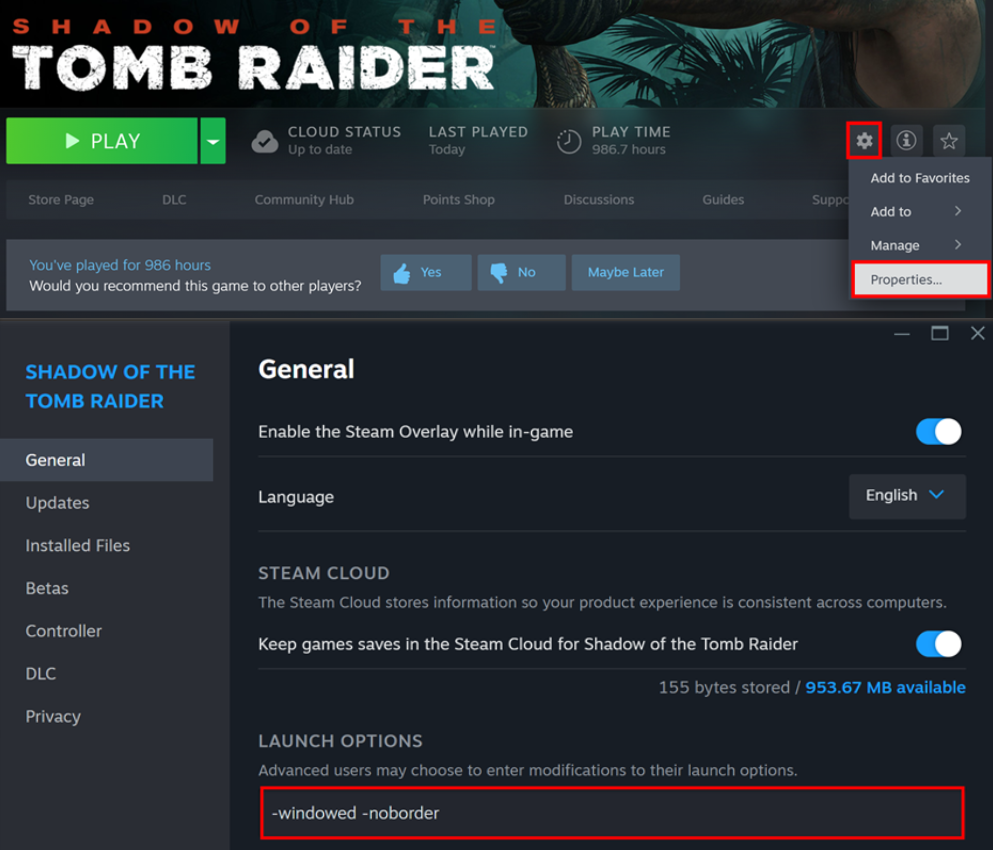
2. Before launching a game for the first time, set the display mode to “Borderless Windowed”.
In the game launcher, such as Steam, open the game's properties and enter the following command in the launch options:
“-Windowed -noborder”
You can also change the display mode manually from the in-game display settings.
Note:
If the same game account was previously used on another device, such as a desktop PC, with high graphics settings enabled, the game may crash when it is launched for the first time on a Claw series handheld due to excessive VRAM usage. Before signing in and launching the game on the new device, we recommend lowering the graphics settings on the previous device to reduce the risk of this issue.
3. Open the “Graphics” or “Display” menu in the game. Set all graphics options to their lowest settings first, then gradually increase them one by one while checking the image quality and FPS to find the right balance between visual quality and performance.
a. Resolution: Keep the default resolution or lower it, such as to 1280 × 720, for smoother gameplay.
b. Display Mode: Using “Borderless Windowed” may help reduce the chance of occasional stuttering in some games.
c. V-Sync: Turn off V-Sync to avoid stuttering caused by fluctuations in frame rate.
d. Ray Tracing: Turn off ray tracing to reduce the GPU's graphics processing load.
e. FPS Limit: Turn off the FPS limit to remove the frame rate cap configured in the game.
f. Image Upscaling Technology: Intel-based models can enable Intel XeSS, while the Claw 8 EX AI+ also supports XeSS 3. The Claw A8 can enable AMD FSR.
g. Graphics Preset: Start with “Low” and gradually increase the setting to “Medium” or “High” until you find the desired balance between image quality and performance.
FAQ
Q: Do I need to manually re-enable Core isolation and Virtual Machine Platform after turning them off?
A: Yes. These features will remain disabled until they are manually enabled again. If you need to use the related security protections, follow the steps in Section C to turn the corresponding settings back on.
Related Articles
[Gaming Master] Doom Eternal – MSI Claw Performance and Settings Guide