[How To] How to Migrate the Factory System to a Newly Installed SSD on an MSI Notebook
Answer
When upgrading to a new SSD on your MSI notebook, the original system drive will be replaced, and the factory pre-installed Windows system will no longer be accessible. To ensure your system continues to work normally after the upgrade, it is recommended to back up the factory system to a USB flash drive before installing the new SSD, then restore it once the installation is complete. This guide will walk you through the complete backup and restore process.
Applicable to all MSI notebooks with a factory pre-installed Windows system
Before You Begin: What Do You Need to Prepare?
A blank USB flash drive with a capacity of 32 GB or more (all data on the drive will be erased during the backup process — please back up any important files beforehand)
Keep the AC power adapter connected throughout the entire process; do not run on battery power
Before installing the new SSD and until the system migration is complete, do not move, delete, or modify any files on the system drive, and do not delete or modify any system partitions
Before installing the new SSD, contact your local service center to confirm the warranty terms, to avoid voiding your original warranty.
Step 1: How Do I Create a Factory System Backup USB Drive Before Installing the New SSD?
Once the new SSD is installed, the original system drive will be replaced. The backup must be completed before installation.
Open the pre-installed system management software on your notebook (e.g., MSI Center). Look for the system backup feature — it may be labeled「Backup」,「MSI Recovery」,「System Recovery」, or「MSI Burn Recovery」, depending on the software version and language settings. Follow the on-screen instructions to back up the factory system to the USB flash drive.
If you are unsure which software is installed or how to proceed, refer to [How To] How to Create a System Backup File on MSI Laptops with Factory Preloaded OS.
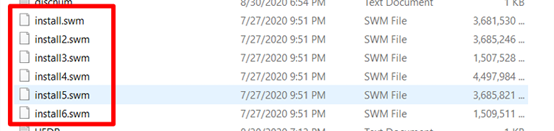
After the backup is complete, verify that the recovery files have been correctly generated before proceeding to the next step. Navigate to the UFDRecovery disk\RECOVERY_DVD folder on the USB flash drive and confirm that the .swm files have been generated in the correct sequence: 「install.swm」, 「install02.swm」, 「install03.swm」, and so on.
Correct result — refer to the screenshot below:
Failed result — refer to the screenshot below:

Step 2: How Do I Restore the Factory System from the Backup USB Drive to the New SSD?
After the new SSD has been physically installed, follow the steps below to restore the factory system to it. Keep the AC power adapter connected throughout. Do not shut down or restart the computer during the restoration process.
2-1 Enter the Boot Menu
Insert the backup USB flash drive into the notebook and press the power button to turn it on
Before the MSI logo appears, repeatedly press F11
When the Boot Menu appears, select the USB flash drive and press Enter to confirm
2-2 Perform System Restore
When the restore options appear on screen, locate and select the system restore function — it may be labeled「System Partition Recovery」or「Restore」, depending on the software used to create the backup and the current language settings
Follow the on-screen instructions to select the target drive (the new SSD), then wait for the restore process to complete without shutting down or restarting
Once the restore is complete, click to confirm and the system will restart automatically
FAQ
Q: How long does it take to create the backup USB drive?
A: The time required varies depending on the notebook model and the write speed of the USB flash drive, but typically takes 30 minutes to over an hour. It is recommended to avoid using the computer for other tasks during the backup process, and to keep the AC power adapter connected throughout.
Q: I kept pressing F11 after powering on, but the Boot Menu did not appear. What should I do?
A: Shut down the computer and restart it. Begin pressing F11 repeatedly just as the MSI logo is about to appear on screen, and check whether the Boot Menu is displayed.
Q: The computer lost power or shut down unexpectedly during the restore process. What should I do?
A: Re-insert the backup USB flash drive, power on the notebook, press F11 to enter the Boot Menu, select the USB flash drive again, and re-run the restore process.