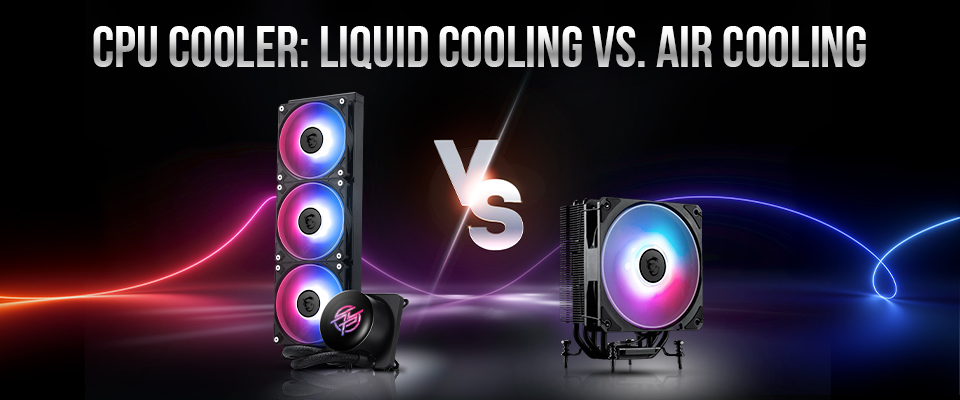
CPU Cooler- Liquid Cooling Vs. Air Cooling: What is Better for Your Next PC?
Case & Components
Quick Answer (TL;DR): It depends! If you want the best possible aesthetics, build within compact cases, or want the best possible cooling for your hardware, a Liquid AIO cooler is the right choice. On the other hand, if you value simplicity and fewer moving parts while enjoying exceptional cooling, an air cooler is the way to go!
When researching air or liquid cooling, you’ll find debates between two factions absolutely convinced that their pick is objectively superior.
While air cooling purists champion the fail-proof reliability and simplicity of a massive chunk of metal and a simple fan, liquid cooling enthusiasts argue that modern high-end computing has simply outgrown air – insisting that a 360mm liquid cooler is the absolute minimum to keep a flagship processor running at peak performance for extended periods.
But before you decide what side you’ll be taking in that next debate, it’s a good idea to take a closer look at both types of solutions. Understanding how they work is the only way to make the right choice for your specific build. You could also factor in the aesthetics of a finished build!
Air vs. Liquid Cooling: How do They Work?
At a fundamental level, both air and liquid cooling share the same idea: transfer heat from your processor to a surface where fans can exhaust them away from your PC’s internals. The key difference lies in how this thermal energy is transported.
Air coolers, also known as ‘Tower’ coolers, use metal (usually Copper) heatpipes filled with a vacuum-sealed liquid to rapidly transfer heat up to a massive metal heatsink. On the other hand, liquid coolers rely on a continuous loop of fluid pumped through tubes to a massive radiator, where fans remove heat from it.
Although it might seem like both end up using a ‘liquid’ to cool your processor, there’s a big difference between them when it comes to transferring heat.
Air Cooling 101: How Does an Air Cooler Cool Your Processor?
The best way to understand what’s happening within an air cooler is, of course, breaking it down into parts and following the journey of a humble pocket of heat leaving your processor. For this purpose, we’ll be using an MAG COREFROZR AA13 air cooler.
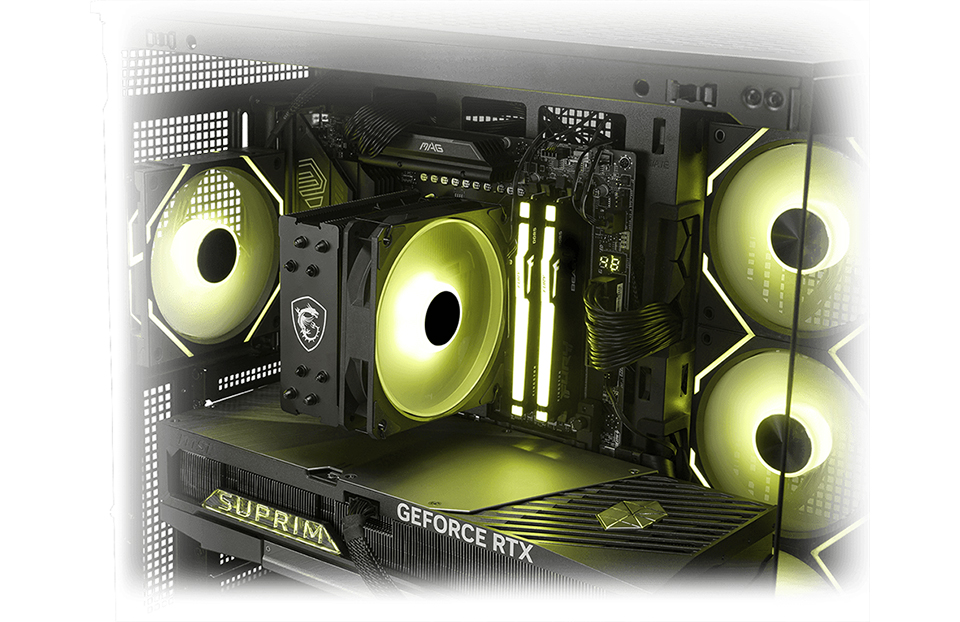
Once you have an air cooler installed, it’ll look something like the system above with a MAG COREFROZR AA13 installed. Keep in mind, your cooler may have one or two (or even three) fans and may or may not have RGB lighting, but it should look similar.
1. The Contact
Everything starts at the baseplate that’s in contact with your CPU. Usually you’ll see a solid, nickel-plated copper block that sits directly atop the processor’s Integrated Heat Spreader (IHS). The heat conducts instantly from the CPU silicon, through the IHS, and into the cooler's baseplate.
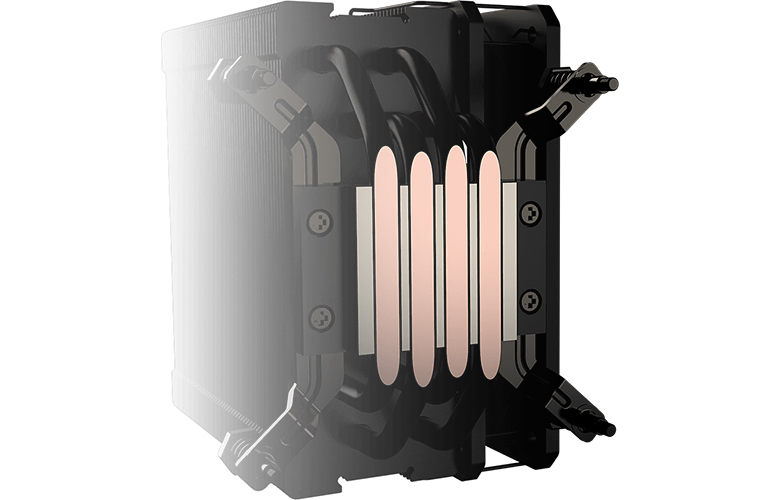
In some more modern air coolers like our MAG COREFROZR AA13 in the example above, you’ll find a baseplate with a direct-touch heatpipes – allowing for more effective heat transfer from your processor.
2. Phase Change
This is where the magic happens. Connected to the baseplate are heat pipes (this one, for example, has four pipes). They might look and feel solid, but they’re hollow, vacuum-sealed pipes that contain a small amount of working fluid (usually purified water).
Because the pipe is a vacuum, the boiling point of the water inside is significantly lower than at room temperature. So, when the heat from the CPU hits the pipes, the water inside instantly turns to vapor. This hot vapor shoots up the pipe toward the top of the cooler, traveling much faster than heat could ever conduct through solid copper alone.
3. The Dissipation
Next, this vapor travels up into the "tower" or the heatsink – a solid stack of metal fins designed to maximize surface area. As the hot vapor reaches the section touching these cool fins, the vapor transfers its heat to the fins.

Once the heat leaves the vapor, it turns back into a liquid (condensation). Inside the pipe walls, a sintered powder wick structure acts like a sponge and pulls the cooled liquid back down to the bottom of the baseplate through capillary action, where it’s ready to boil again. This cycle happens continuously – thousands of times per minute.
4. The Removal
Last, the fans come into play. An air cooler like this one uses high-end static pressure fans to force cool air through the tight gaps in the aluminum fin stack. This cool air grabs heat stored in the fins, making it warm, and this warm air blows out the back of your cooler, and eventually your PC case.
Liquid Cooling 101: How does a Liquid Cooler Cool Your Processor?
While air coolers rely on the passive physics of phase change within heat pipes, Liquid Cooling (AIOs, custom loops) depends on an active mechanical system.
It uses a pump to circulate a coolant (usually a mix of distilled water and propylene glycol) through a closed, sealed loop. This fluid absorbs heat directly from the processor and physically transports it away from the motherboard to a large radiator, where fans blow the heat out of the case.
But to understand why this complexity can prove more effective in some cases, you need to see the mechanism in action.
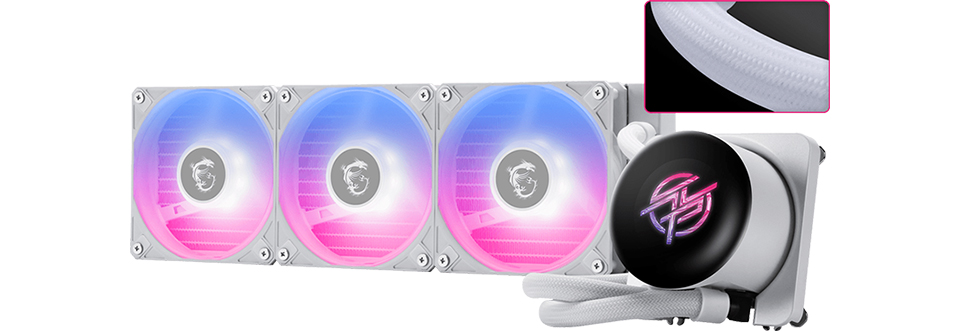
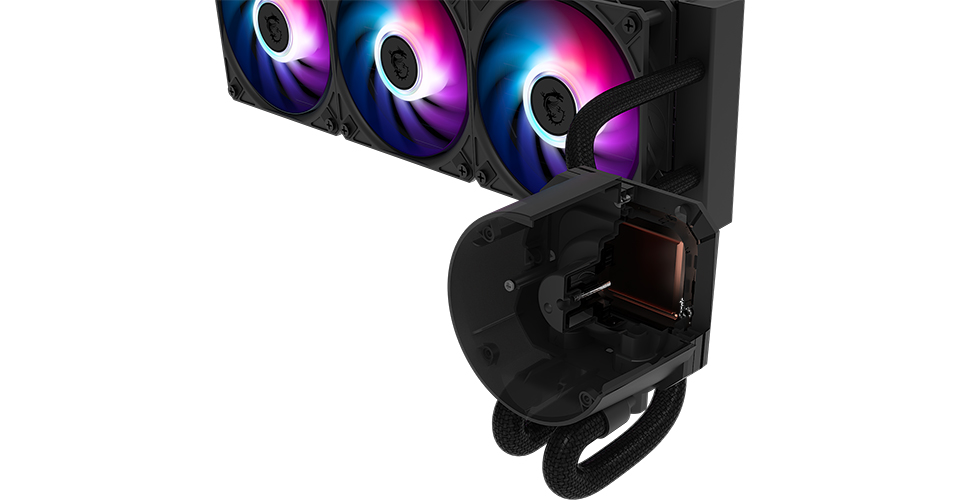
Let’s follow the heat through the loop this time to learn more about how a liquid cooler works. To do this, we’ll be breaking down the MPG CORELIQUID P13 Liquid Cooler into its core parts and explaining what happens at each stage of the process.
1. The Cold Plate
Just like an air cooler, it all starts with a copper plate that’s in contact with the CPU. However, if you look at the "wet side" of that copper plate (inside the block), it isn't flat. It features hundreds of micro-fins – tiny channels often less than 0.1mm wide.
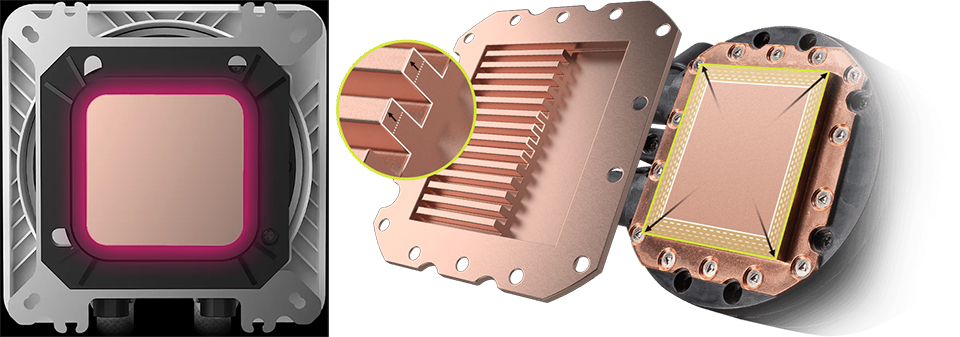
As the coolant is forced through these channels, the massive surface area allows the liquid to instantly move heat away from the copper.
2. The Pump
Sitting directly above the cold plate is a mechanical pump that has one job – pump the water through this closed loop; it’s the engine of the loop.
The pump creates pressure, forcing the heated liquid out of the block and into the outlet tube. Unlike the passive vapor in an air cooler, a pump aggressively forces the heated liquid through the tubes and to the radiator.
3. The Radiator and Fans
The hot liquid travels through rubberized, permeation-resistant tubing to the radiator. Inside this radiator, the liquid splits between multiple thin, flat channels with folded metal ribbons (fins) sandwiched between them – this is called the radiator. As the hot water passes through the channels, the heat transfers into these fins.
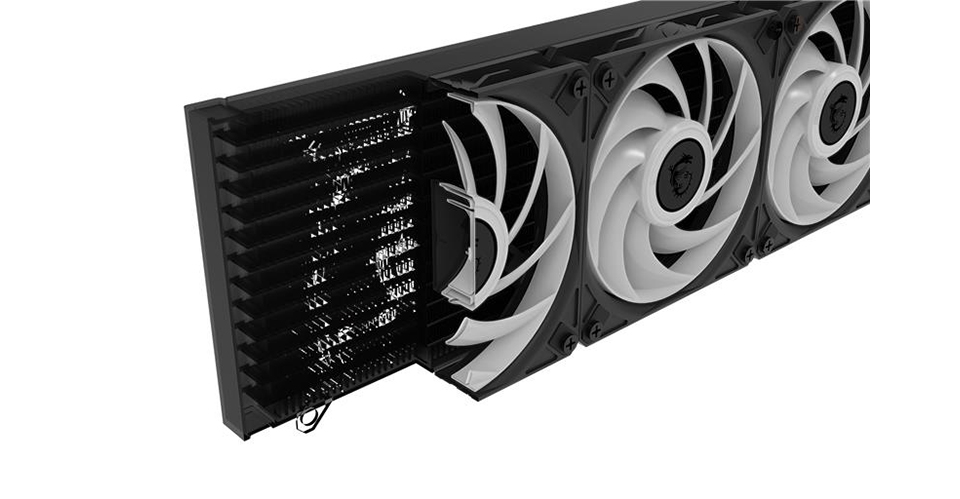
Fans mounted to the radiator blow cool air through these fins, carrying the heat out of the case. And by the time the fluid reaches the end of the radiator, it has cooled down significantly. Finally, the second tube carries the cooled liquid back to the CPU block (cold plate and pump) to restart the cycle.
The Liquid Edge
The secret sauce of liquid cooling is the liquid’s high specific heat capacity. What this means is that it takes a lot of energy to raise the temperature of water, which is perfect for bursts of CPU usage. It allows the large volume of liquid in the cooler to absorb occasional CPU spikes without immediately getting hot – keeping your system more silent during bursty workloads by preventing your fans from ramping up and down constantly.
A Quick Checklist: Should You Go with Air or Liquid Cooling?
Now that you understand the hardware, the decision becomes more straightforward.
Choose Air Cooling If:
- You Want "Set and Forget" Reliability: When you’re building a workstation that needs to run unattended, air cooling is the right choice. The only moving part, the fan, is easy to replace.
- You Have a Strict Budget: The price-to-performance ratio of air cooling is undeniable. Modern dual-tower air coolers from top brands can often rival liquid coolers that cost quite a bit more.
- You Are Using a Budget or Mid-Range CPU: Processors like the Intel Core 5 and Core 7 or AMD Ryzen 5 and 7 series are perfectly fine with a decent air cooler. Unless you’re pushing extreme overclocks, a quality tower cooler will keep these chips well within safe thermal limits without breaking a sweat.
Choose Liquid Cooling (AIO) If:
- You’re Chasing Peak Performance (Core 9 / Ryzen 9): If you’re running a flagship Intel Core 9 or AMD Ryzen 9, you’re probably dealing with power draws that can exceed 250W. A 360mm AIO is often the most effective way to prevent thermal throttling during heavy multi-core workloads and keep noise levels low.
- You’re Building in a Compact Case (SFF): In Small Form Factor builds, you won’t have the vertical clearance needed for a massive air cooler tower. Liquid cooling allows you to mount the CPU block (which is very low profile) on the motherboard and relocate the bulky radiator to a part of the SFF case where it actually fits.
- You Transport Your PC Frequently: Heavy air coolers hang a kilo or more (2-3 lbs) of metal off your motherboard, which isn’t ideal during transport. AIOs shift most of that weight to the radiator – relying on the case frame more than a mounting mechanism. This makes it safer if you’re moving your PC around frequently.
- You Value Aesthetics and Modern Features: From an aesthetics perspective, liquid cooling is unbeatable. The compact waterblock elevates the internals of your PC, especially with some tasteful lighting. They may also come equipped with features you want like a screen that allows you to track system temperatures, CPU usage, and so much more.
Once you’ve settled on a cooler for your next build, these resources will help get your PC up and running smoothly:
EZ AI PC Builder: MSI’s AI-powered PC part recommendation tool. It automatically picks compatible coolers and parts – making it perfect to get a starting point for your build.
How to Apply Thermal Paste: A step-by-step guide to applying thermal paste on your CPU cooler.
How to Assemble a PC (Video Tutorial): A visual, step-by-step guide to assembling a PC from scratch!
Busting A Few Air vs. Liquid Cooling Myths
Before you settle on a pick, let’s address a few myths that we’ve seen in discussions online over the years.
Myth 1: "Liquid coolers leak and will destroy my PC."
Fact: Modern AIO Coolers are factory-sealed and chances of leaks are astronomically low.
The Reality: While this was a valid fear in the early days of custom water cooling, modern All-in-One (AIO) coolers like the MPG CORELIQUID P13 in our example above feature industrial-grade durability. They’re closed-loop systems, which are factory-sealed, pressure-tested, and built with permeation-resistant and gunk-resistant EPDM rubber tubing.
Myth 2: "Liquid cooling is always quieter than air."
Fact: Not always. In fact, a high-end air cooler is more likely to be quieter at idle than an AIO.
The Reality: Liquid coolers have a pump that’s always running – producing a dull hum (this experience can vary with manufacturer) even when your PC is doing nothing. Furthermore, smaller AIOs (like 120mm or 240mm) have less surface area, meaning their fans may have to spin a lot faster (and louder) to dissipate heat.
Myth 3: "Liquid cooling is automatically better than air cooling."
Fact: A cheap liquid cooler is almost always worse than a good air cooler.
The Reality: A 120mm AIO (single fan) is widely considered one of the worst value purchases in PC building because it lacks the surface area to cool modern chips effectively. In fact, a quality budget dual-tower air cooler will absolutely crush a more expensive 120mm liquid cooler in both thermals and noise levels. Liquid only becomes the superior performance option once you step up to larger radiator sizes.
Myth 4: "I need to refill the water in my liquid cooler."
Fact: You never need to open an AIO.
The Reality: People often confuse AIOs (Closed Loop) with Custom Loops (Open Loop). Custom loops require maintenance, draining, and refilling. AIOs are "zero maintenance" units. You install them, run them for their lifespan (usually 5-7 years), and when they eventually wear out, you replace the entire unit. You cannot, and should not, try to refill them.