How to Speed Up Your RAM with Overclocking: The Ultimate Guide to Enabling XMP and EXPO
Motherboards
If you haven’t fiddled with the BIOS/UEFI of your PC in a while, just built a PC with new memory modules or upgraded your workstation, chances are your RAM is running at slower speeds than you might expect.
During the initial boot, all motherboards will operate memory modules at ‘JEDEC’ default settings. These default settings are the industry standards for memory speeds, timings, and voltages defined by the JEDEC Solid State Technology Association; the standards body for the computer hardware industry. Intel and AMD processors and chipsets conform to these standards to guarantee a stable computing experience.
However, if you’ve bought high-performance memory like, say, a Kingston FURY kit that’s factory-tuned and tested to operate at higher speeds, lower latencies, and higher voltages than JEDEC industry standard, chances are your system isn’t set up to take advantage of those higher speeds yet. In this article, we’ll go over a few memory-related terms that you should know, explain how to enable higher speeds for your memory, and what to do if things don’t go quite as expected after fiddling with your BIOS!
The Basics: Key Terms You Should Know
Before we dive into your BIOS, it’s important to know and understand a few key terms related to memory.
- RAM (Random Access Memory): This is your PC’s short-term memory, which allows your CPU to access data it needs frequently way faster than it can from your storage devices.
- Memory Channels: Memory channels define the number of communication paths between a processor and installed memory modules. For example, running in dual channel means your CPU has two paths to access your memory, and these paths are combined for higher performance (more bandwidth) with two identical memory modules installed.
- BIOS (Basic Input/Output System): Refers to the (now legacy) firmware that initializes your hardware and boots your operating system when you turn your PC on. The BIOS menu is accessible by pressing a key when the PC is first turned on, allowing you to manually adjust settings and enable/disable features.
- UEFI (Unified Extensible Firmware Interface): This is the modern standard that replaced the BIOS, allowing for faster boot times, support for massive storage devices, and better built-in security features. That said, you’ll see many discussions and articles refer to this interface as a ‘BIOS’ too, so in most non-technical cases, you can assume they mean the same thing.
To explain this next part, we’ll need a memory kit. Let’s go with the Kingston FURY Beast DDR5 RGB 32GB 6000MT/s as an example, which you might see listed on e-tail sites such as Amazon with a product name that looks something like this:

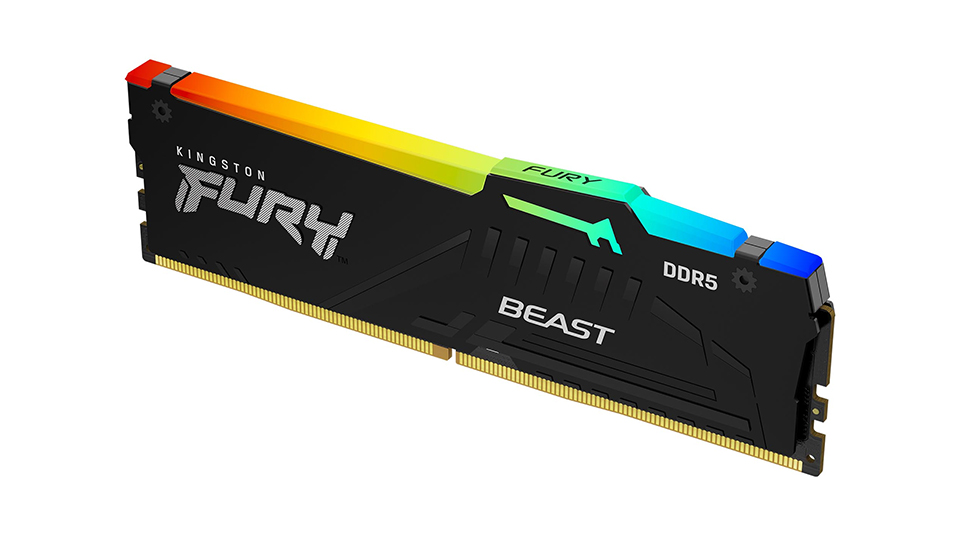
So, what do the terms used in this product name mean? They basically tell us that this Kingston FURY Beast kit features two memory modules of 16GB each, with a data rate of 6000MT/s and a CAS Latency of 30. Lets delve deeper into a few of those terms and others:
- ‘Speed’ or Data Rate (MT/s): RAM speed is measured in Megatransfers per second (MT/s) and refers to the data rate of memory, which tells you how many millions of data packets can be moved in and out of memory per second. Higher speeds are better, meaning data is transferred at higher rates to increase performance.
- CL (CAS Latency): CL is the first of four factory preset timings and arguably the most important, hence why it’s mentioned in the part number and description. It indicates the time it takes in clock cycles to find memory data needed to be accessed. If you look at the description of the Kingston FURY Beast kit listed above, you’ll see the number of clock cycles next to the letters ‘CL’. Lower is better, meaning less time waiting for data to come back to the processor from the RAM. For more details, feel free to head over to the Kingston website:.
- OC (Overclock): OC refers to hardware that is running above its ‘default’ JEDEC standard speed, timings, or voltage. Overclocking can be done not only on memory components, but on processors and graphics cards as well. Attempting an overclock may introduce instability, so it’s a good idea to perform a few test benchmarks and gaming runs to make sure stability is rock-solid.
- JEDEC Standard Speeds: The industry standard memory speed, timings, and voltage that your RAM will default to when using it without enabling Intel XMP/AMD EXPO factory programmed overclock profiles. So, if you grab the above Kingston FURY Beast DDR5 kit, you’ll be running at a JEDEC standard speed by default, based on what the chipset and processor support, not the overclock speed, timings, and voltage the memory is capable of running.
- Intel XMP (eXtreme Memory Profile): An Intel technology that allows you to overclock your memory using a factory preset profile – enabling a one-click OC within the BIOS. On the kit above, this would mean setting the RAM speed to 6000MT/s with lower timings at a higher voltage.
- AMD EXPO (Extended Profiles for Overclocking): This is AMD technology that allows for one-click overclocking in the BIOS that sets your memory to its advertised speeds with a factory preset profile.
- DIMM (Dual In-Line Memory Module): The technical term for your ‘stick’ of RAM that plugs into the motherboard. Each of these modules is referred to as a DIMM.
How to Enable XMP or EXPO in Your BIOS (UEFI)?
The steps to enable higher memory speeds can vary from manufacturer to manufacturer, but the basic idea behind it remains the same: access your BIOS interface, find the correct settings page, set an OC profile for your memory, save, and reboot.
In this guide, we’ll be using MSI’s Click BIOS X to show you how to enable XMP/EXPO for better performance. Brands like MSI often go through extensive validation and co-engineering with top memory brands like Kingston to give you a safe, simple, and stable overclock experience.
1. Gain access to your motherboard’s BIOS by rebooting (if your PC is already on) and then pressing the ‘DEL’ key on your keyboard (for MSI motherboards) while it’s turning on. For other manufacturers, you may have to hit a different key like F2.
2. If successful, you should see your BIOS screen, and if it’s a modern MSI BIOS, it’ll look something like the screenshot below.
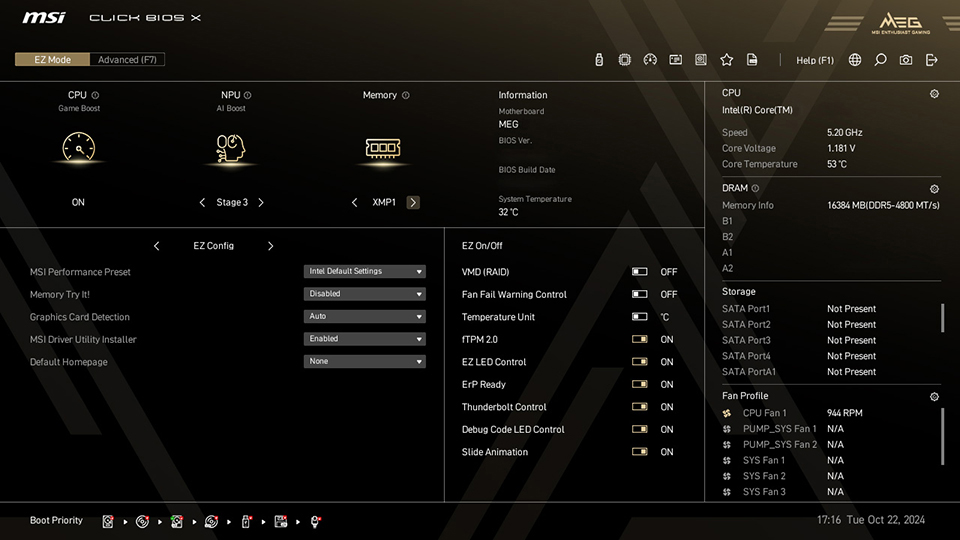
3. By default, your interface will be set to ‘EZ Mode’ – giving you access to a ton of functionality within a simple UI that’s easy to follow and understand. If you’re not familiar with your BIOS (UEFI), we recommend staying on ‘EZ Mode’ to set an XMP/EXPO profile for your memory. Below is a quick overview of what you’ll find in each section.
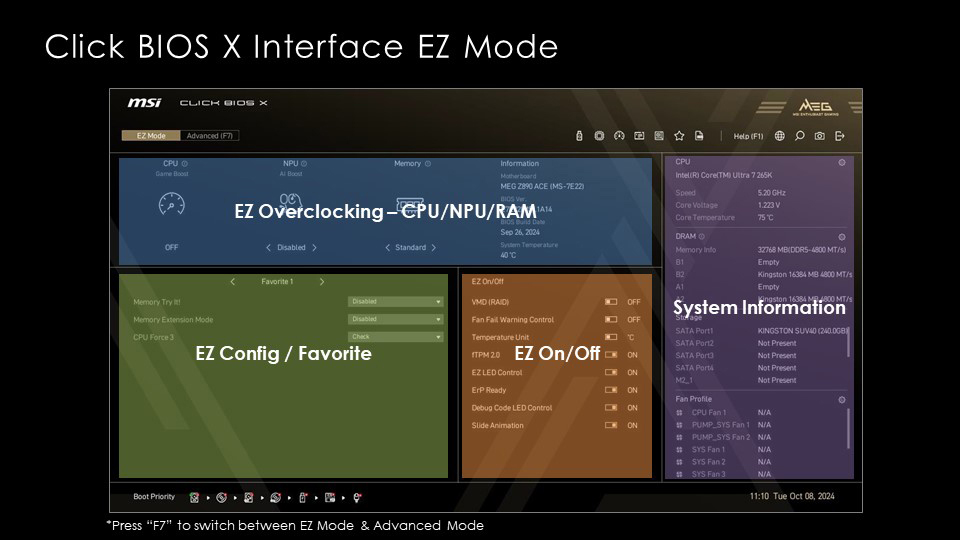
4. On this ‘EZ Mode’ page, you’ll find a set of one-click overclocking controls in the top-left corner (highlighted below).
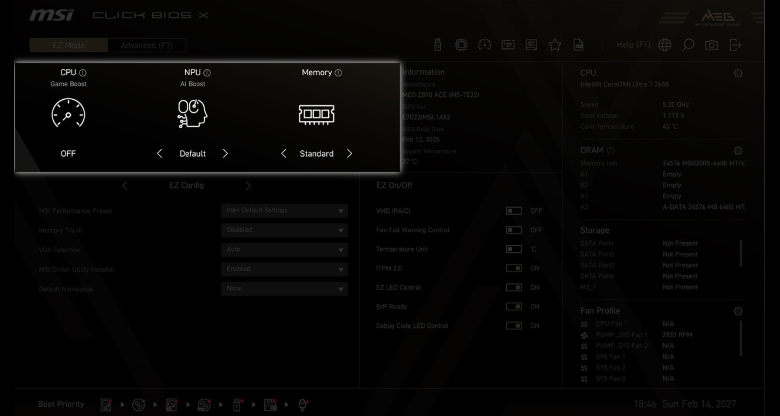
5. Look for the label that says ‘Memory’ and then change the setting below it to XMP1 (or EXPO1 if you’re using an AMD processor) from the default ‘Standard’ setting.
6. That’s it! Now you can hit the ‘F10’ key to save these settings and reboot your PC.
7. When your PC boots up, it should be using the correct memory profile, and you should be getting higher speeds. You can confirm the overclock was successfully engaged within task manager on Windows 11 (Performance tab > Memory) or using MSI Center. In our example using the Kingston FURY Beast DDR5 kit, you would see the memory speed reported as 6000MT/s.
Note: If you want a deeper dive into MSI’s Click BIOS X, you can find more information here. Also, you’ll find more info about what to do in case your PC refuses to boot after this tweak down below.
Beyond XMP and EXPO: Unlocking Even More Performance
Now that you’ve enabled XMP/EXPO, your memory is finally running at its rated speeds. But you can go even further if you want. MSI has engineered Intel and AMD-specific optimizations that boost performance further with just a few clicks.
What is Memory Extension Mode for Intel?
If you’re running an Intel Core Ultra processor on an MSI motherboard, you can squeeze out even more performance using MSI’s exclusive Memory Extension Mode. This BIOS setting adds on your existing XMP profile to further fine-tune your memory's sub-timings. With this, you can expect latency to reduce an additional 12% to 16% compared to standard configurations.
It's important to note that since you're pushing the memory module performance beyond it's factory programmed and tested specifications, stability is not guaranteed by the memory manufacturer.
All in all, this translates to better responsiveness, which means smoother, more responsive gaming and better experiences when handling latency-sensitive creative workloads.
So, how do you enable this?
- Access your MSI BIOS like we covered above.
- Switch from ‘EZ Mode’ to ‘Advanced Mode’ to bring up a more complex, but more powerful interface.
- Head to the ‘Overclocking’ page and scroll down until you find an option labeled ‘Memory Extension Mode’.
- Select your desired mode and hit F10 to save your settings and reboot!
You’ll find more details and explanations about this feature in their article here.
What is MSI Latency Killer and High-Efficiency Mode?
While Memory Extension Mode helps Intel chips, MSI Latency Killer and High-Efficiency Mode are designed to optimize performance for AMD processors.
Latency Killer is an MSI-exclusive feature that reduces memory latency by up to 12%. It allows you to fine-tune memory performance alongside EXPO profiles or manual memory overclocks. So, if you’re looking for even more performance, you can try out MSI’s High-Efficiency Mode for even better performance.
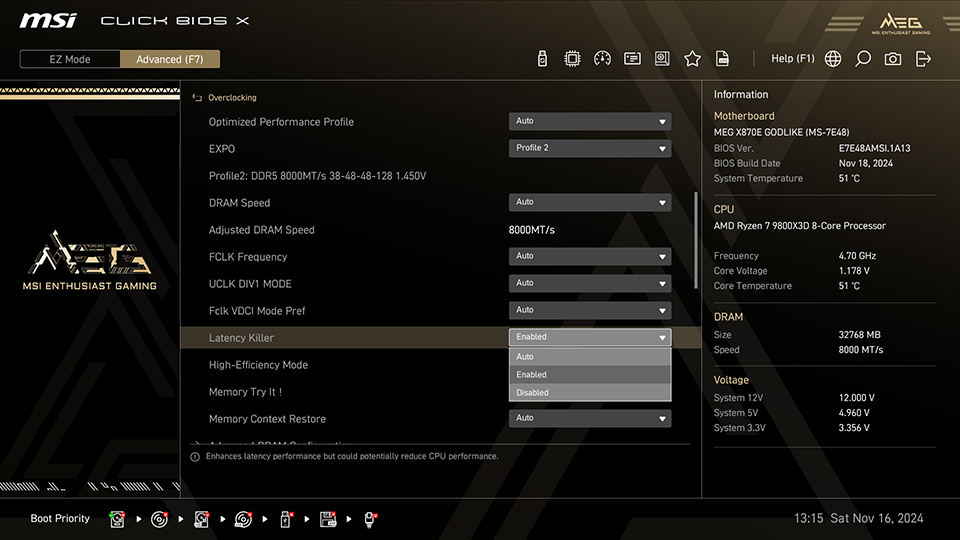
If you’re curious about these settings and want to learn more about what you can expect out of them, you’ll find more details in our Latency Killer for AM5 article here.
What Should You Do if Your PC Crashes After Enabling XMP/EXPO?
Okay, so you’ve enabled a bunch of settings in your BIOS (UEFI), and now your PC won’t boot up like it used to?
First off, there’s absolutely no need to panic as this is a perfectly normal part of an overclocking journey.
- Now, if your PC’s fans are spinning and you see it light up, but no display, the best thing to do, especially for AMD Ryzen systems, is to just wait for a while.
- If waiting doesn’t help, it’s time to troubleshoot.
- Head into your BIOS (UEFI) like we did last time and restore all settings to their default values. On MSI motherboards, this can be done using the F6 key. Then save all settings and reboot with the F10 key.
- With default settings, if your PC boots up fine, the overclock unfortunately wasn’t stable enough. This can happen from time to time, so there’s no reason to worry.
- To get around this, you can use the Memory-Try-It feature on MSI motherboards to try a few common memory timings to check if your memory is stable with any of them. Again, you’ll repeat the above steps if your PC doesn’t boot.
Which MSI Gaming Motherboard Supports the Highest DDR5 Overclocking Frequency?
While some motherboards are built for general computing, there are some that are specifically designed from the ground up for extreme overclocking and shattering world records. Two such examples are the MEG Z890 UNIFY-X for a modern Intel platform and the MEG X870E UNIFY-X MAX for those on AMD’s AM5 platform!
Both motherboards combine AI server-grade components, a dedicated PCB layout for enhanced memory signal integrity, and specialized 2-DIMM 1SPC (One Slot Per Channel) architecture to deliver unparalleled memory overclocking performance. These dedicated designs ensure maximum memory efficiency, stability, and reliability for enthusiasts and overclockers alike.
In addition to enabling an excellent overclocking experience, the MEG X870E UNIFY-X MAX and the MEG Z890 UNIFY-X motherboards also come equipped with premium features like FROZR Heatsinks, 5G LAN, Wi-Fi 7, PCIe 5.0 and exclusive Tuning Controller accessory so you can enjoy stellar performance on all fronts.