Get Started with MSI DigiME's AI Motion Capture for Your First Virtual Stream
Motherboards ,
Desktops
MSI and Red Pill Lab have co-developed
DigiME – a convenient, more accessible, AI-driven motion capture and streaming software. It allows you to create
a virtual avatar, place it into a virtual space of your choosing, and stream it to your audience.
The best part? You don’t need any specialized equipment for it!
How Does DigiME Work?
While conventional motion capture typically relies on expensive equipment, powerful hardware,
and complex sets, we took a different approach with DigiME.
With an AI-powered motion detection engine, DigiME supports full body motion capture using just
a standard webcam and a microphone. What’s more, it boasts broad compatibility with various streaming and video
conferencing apps, giving streamers a new way to interact with and engage their audiences.
At its core, DigiME is built to leverage the ray tracing capabilities of NVIDIA’s RTX graphics
cards and Intel’s next-gen NPU, built into its Core Ultra (Series 2) desktop processors.
While the graphics card handles the real-time rendering of your virtual space, the NPU offers a
powerful, more efficient way to handle AI computation workloads like real-time motion capture.
If you don’t have an NPU yet, you can still use the integrated graphics of your current
processor. However, your mileage may vary, when it comes to performance.
How to Get Started with DigiME
We’ve designed DigiME to be as simple as possible – ensuring an intuitive interface that’s easy
to use and navigate.
Once you log in, you can access the interface to customize your favorite avatar and space.
Now, you’ll see the application open in a window like the one below.
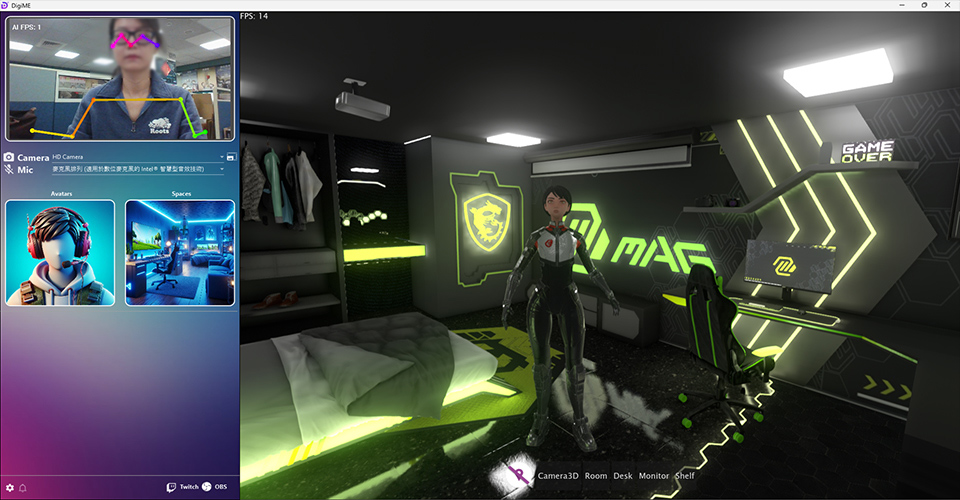
The main DigiME interface displays your camera feed on the top left, your camera and microphone
devices below it, followed by the “Choose Avatar” and “Choose Spaces” options.
Before we do anything else, make sure your camera feed is showing up on the top left and the
correct microphone device is selected from the drop-down menu. If your camera isn’t visible, pick the right
camera from the Camera drop-down menu.
Now, let’s start making our Avatar! Once you select ‘ReadyPlayerMe’, you should see the avatar
interface.
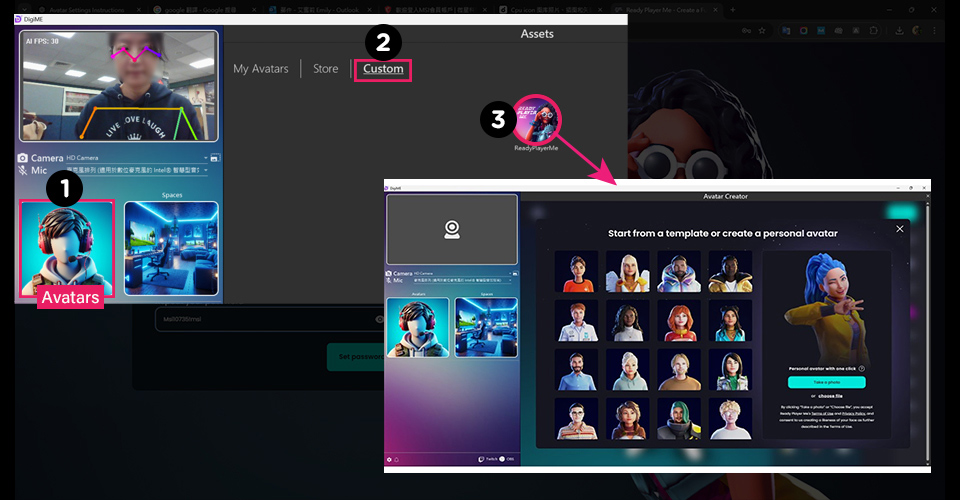
DigiME supports ReadyPlayerMe avatars, so you can import any existing avatars to DigiME once
you sign into your account. If you don’t have an account yet, you can sign up for one later to save your custom
avatars to the cloud.
Once you’re logged in (or if you’ve skipped this step), you can start creating a custom avatar.
There are 2 ways to create a custom avatar. You can either pick a preset avatar from the list
of available choices or use a photo to generate one. If you want to use a photo, you can upload an existing one
or take a photo using your webcam.
For this guide, we’ll take one using the webcam. Please make sure that your face clearly
visible.
Once your photo is uploaded and you’re happy with the generated virtual model, you can start
customizing it to your liking. There are scores of fashion items, hairstyles, make up, and so much more –
allowing you to add a personal touch to your Avatar.
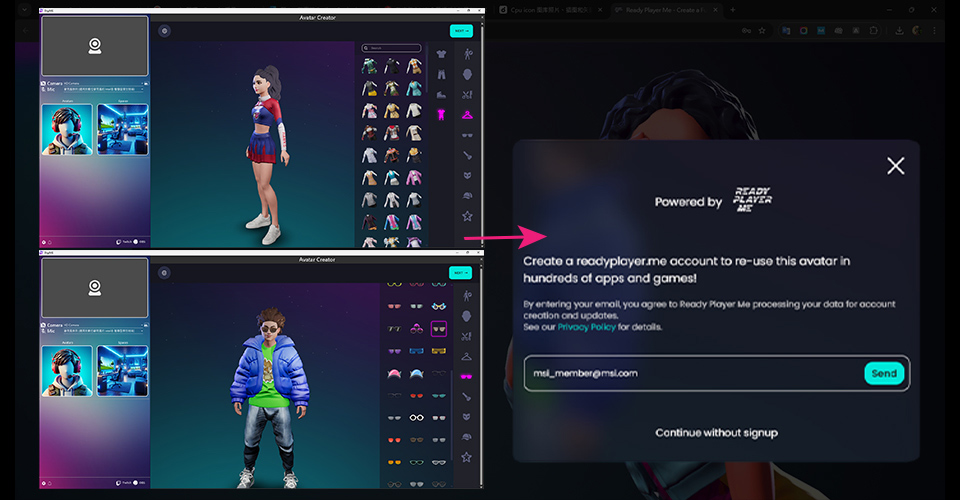
When you’re pleased with your handiwork, give the avatar a name and save it. Now, you can
choose to create a readyplayer.me account and save this avatar to the cloud – allowing you to reuse your avatar
with other applications.
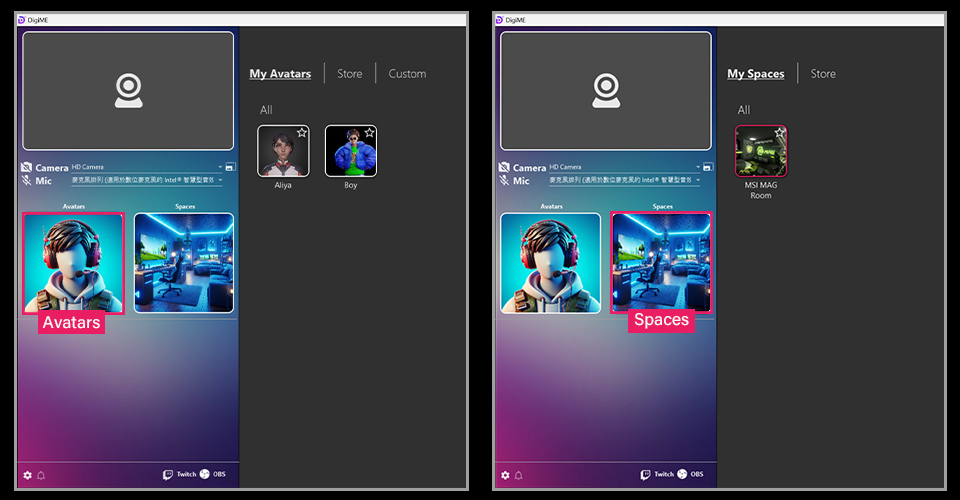
Either way, the avatar you just created will now show up as an option when you click “Choose
Avatar” in the main DigiME interface.
Next, we’ll pick our preferred virtual space. Click “Choose Spaces” and head into the “Store”
to view a list of all the available virtual spaces within DigiME and pick your favorite one.
The application comes pre-loaded with one room, and several others that you can download from
the store – each with its unique aesthetic. Once you’ve settled on a space that looks good to you, pick it to
instantly replace your real surroundings!
If all goes well, your center interface should now display your virtual avatar, which moves and
lip-syncs to your motion and voice respectively. It should also display the avatar within the virtual space that
you picked above.
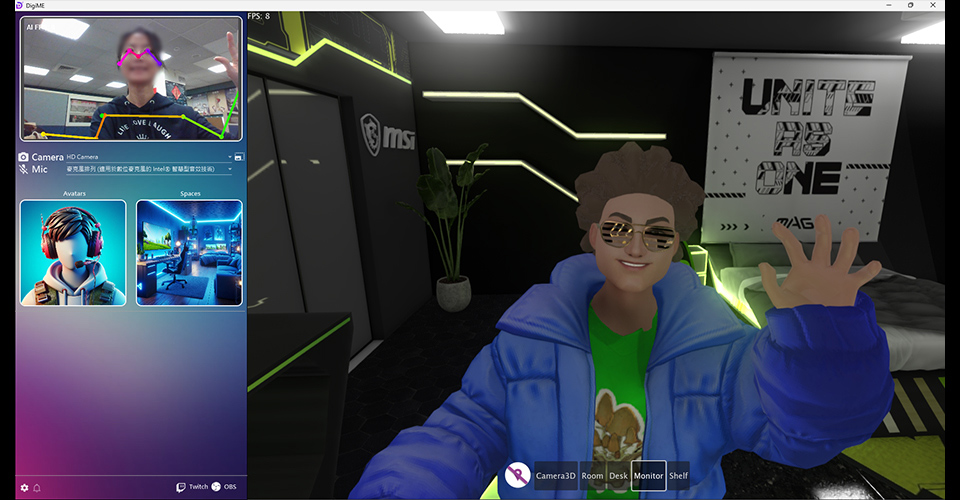
Test it out and make sure it’s in sync before moving on to the next step.
At the center bottom of the DigiME interface (highlighted below), you can pick from a variety
of camera positions to further personalize your virtual self and space – and how you interact with your
audience.
Pick the camera that looks best to you. Here, you can further tweak its look by zooming in or
out of the scene with the scroll wheel of your mouse. It allows you to highlight the space or your virtual self
in real-time, as needed.
Before we go online, it’s important to fine-tune your DigiME experience. There are a few
settings that help you do so, with the first being “Mirror Webcam”.
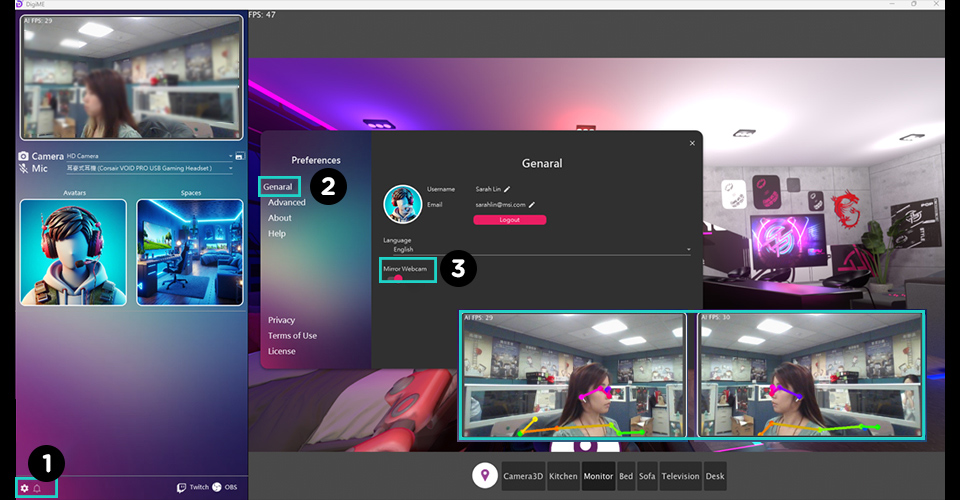
Movement can feel awkward when your webcam isn’t mirrored, so just enable this setting if
you’re more comfortable with a mirrored feed when streaming.
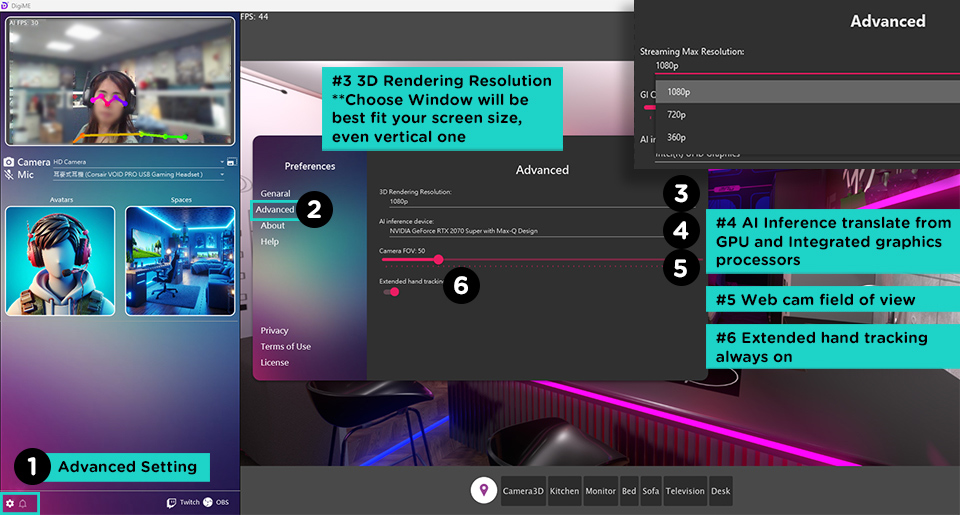
For advanced users, DigiME offers a set of advanced features to tweak your experience to your
liking.
Head into settings, and pick “Advanced” on the left tab to open the interface displayed above.
Here, you can pick your preferred render resolution (to reduce the load on your GPU), pick your
preferred AI inference device (MSI recommends an NPU), and set the camera FOV (Field of View) to further tweak
your virtual space and self.
Once you’re done fine-tuning these settings, it’s time to go online! Pick the streaming
application of your choosing, and open it. For demo purposes, we’ve gone with Google Meet.
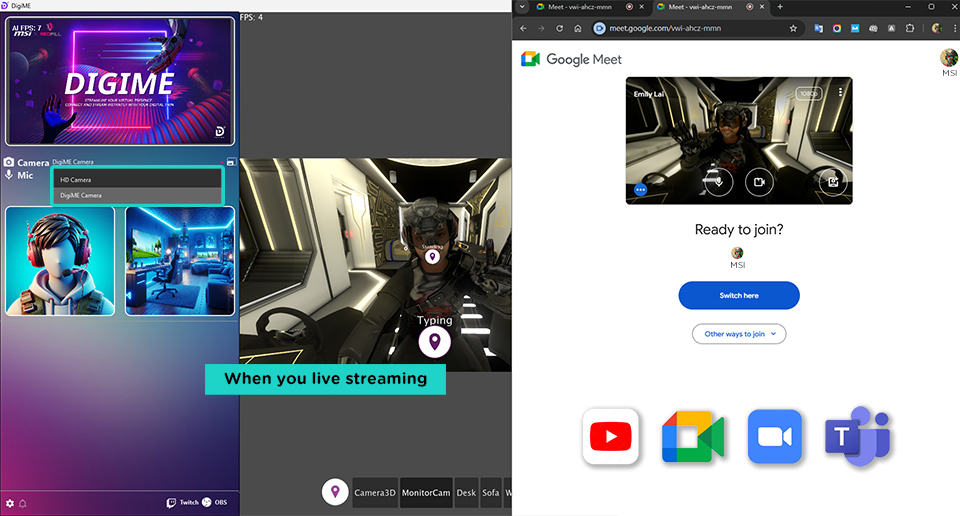
If DigiME is set up correctly, you should see the “DigiME Camera” as a camera option within
your streaming/conferencing software. Pick it, and you should see your DigiME virtual avatar and space show up.
If you’re using any other app like OBS, Streamlabs, Skype, etc., the instructions don’t vary
too much.
DigiME presents itself as a camera to your operating systems, allowing for such broad
compatibility. So, simply pick “DigiME Camera” as your camera within the application of your choosing, and your
virtual avatar is ready to go online!
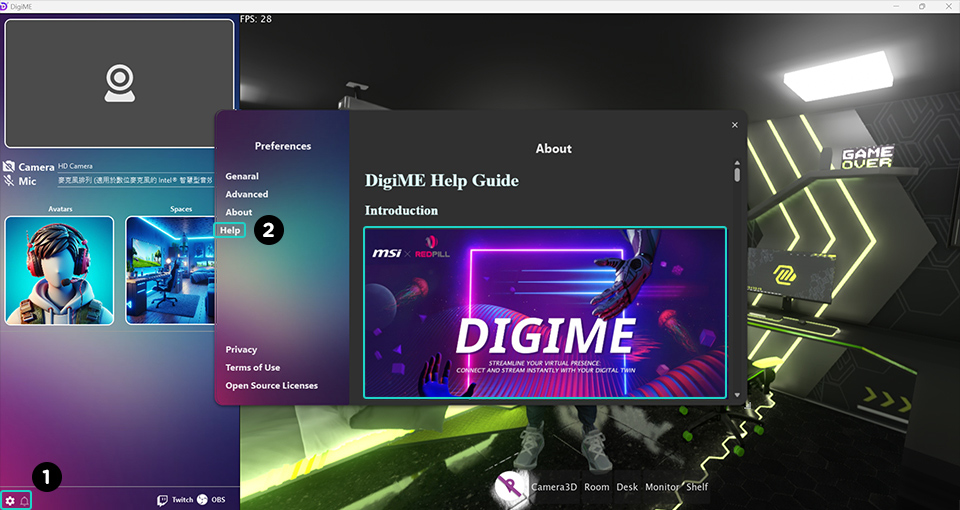
Of course, if you need any additional help, head to the DigiME Help Guide in preferences
(highlighted in the image above).
Recommended Hardware for the Best DigiME Experience
For the best DigiME experience, we recommend using at least an RTX 2060 GPU and a processor
with an on-chip NPU, like Intel’s Core Ultra 200 processors. If you don’t have access to an NPU, you can rely on
your integrated graphics instead.
Newer desktops and desktop processors now come equipped with the capabilities needed to handle
these modern AI workloads. So, it’s important to have a great platform to support them.
MSI offers a
range of AI-Ready 800-series Motherboards for Intel Core Ultra (Series 2) Processors that boast features
like NPU boost to further enhance AI processing power.
You’ll also find a lineup of MSI Gaming Desktops featuring AI-ready Intel Core Ultra (Series 2)
processors here.
Download DigiME here to get
started with your virtual stream right away!
For more information about DigiME, please head to our DigiME campaign page.