How to Check What Motherboard l I have
Motherboards
Quick Answer (TL;DR): The fastest way to find your motherboard model on Microsoft Windows is by opening up command prompt and typing ‘msinfo32’ (without the quotes) and hitting Enter. It should open a System Information window that shows you the model of your motherboard as well as your motherboard manufacturer’s name.
If you haven’t built your PC yourself or if it’s been a while since you’ve built it, chances are, you don’t really remember/know what motherboard is sitting inside your system. So, when you find out about an important BIOS update or feel the itch to upgrade to a new CPU, you’re left wondering what model you have and whether compatibility will be an issue.
Of course, the most obvious way is to find your motherboard’s box/manual and look at the manufacturer and model name there. But for the purposes of this guide, we’ll assume you no longer have access to any of that. What’s more, this is useless if you want to find your BIOS version.
What are the Easiest Ways to Find Your Motherboard’s Model or BIOS Version?
There are several ways to identify your motherboard. Some manufacturer-specific and others OS-specific, and yet others that just require access to your motherboard’s BIOS.
Method 1: Using System Information on Windows
If you’re on any version of Microsoft Windows, you can use ‘System Information’ to find your motherboard model. Here’s a step-by-step with screenshots that show you the process –
1. Press Win + R to open the Run window.
2. In this window, type ‘msinfo32’ (without the quotes) and hit Enter.
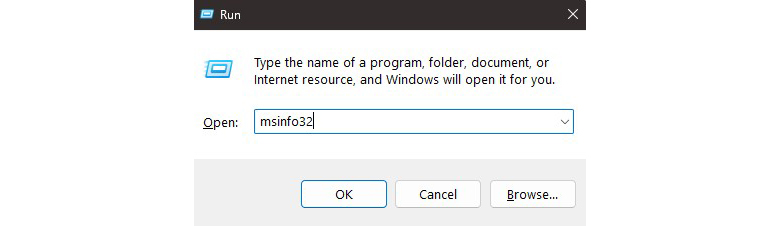
3. You’ll see a new window open called “System Information”.
4. On the left, make sure “System Summary” is selected. Now, look for Baseboard Manufacturer and Baseboard Product. This will give you your motherboard’s manufacturer name as well as its model name.
5. If you want your BIOS version, look for BIOS Version/Date within this same window.
Method 2: Using PowerShell on Windows
This next method is again meant for those using Microsoft Windows, but this one is by far the quickest, and is also Microsoft’s recommended way for more advanced users to find their motherboard’s manufacturer name, model name, and even BIOS details.
1. Hit the start button, type ‘powershell’ (no quotes), and hit Enter. This should open a PowerShell window. Note – You can also type ‘powershell’ within the Run (Win + R) window or the command prompt window for the same result.
2. In the PowerShell window, type the following commands for each of the pieces of information you need and hit Enter:
3. For motherboard manufacturer and model name: Get-CimInstance -ClassName Win32_BaseBoard | Select-Object Manufacturer, Product, Version
4. For BIOS Version: Get-CimInstance -ClassName Win32_BIOS | Select-Object SMBIOSBIOSVersion
Method 3: Using BIOS/UEFI
While the above two methods rely on a specific operating system, you might need this info without accessing your operating system. So, we’ll be heading to your motherboard’s BIOS and identifying your motherboard’s model name there.
1. Before you get to your OS loading screen, press the F2 or DEL key on your keyboard several times. Most motherboards should let you enter their BIOS/UEFI using one of these keys.
2. Once you’re in your BIOS, you should see the motherboard model, BIOS version, and other hardware details listed on the first page for most manufacturers. Here’s an example from MSI’s Click BIOS X.
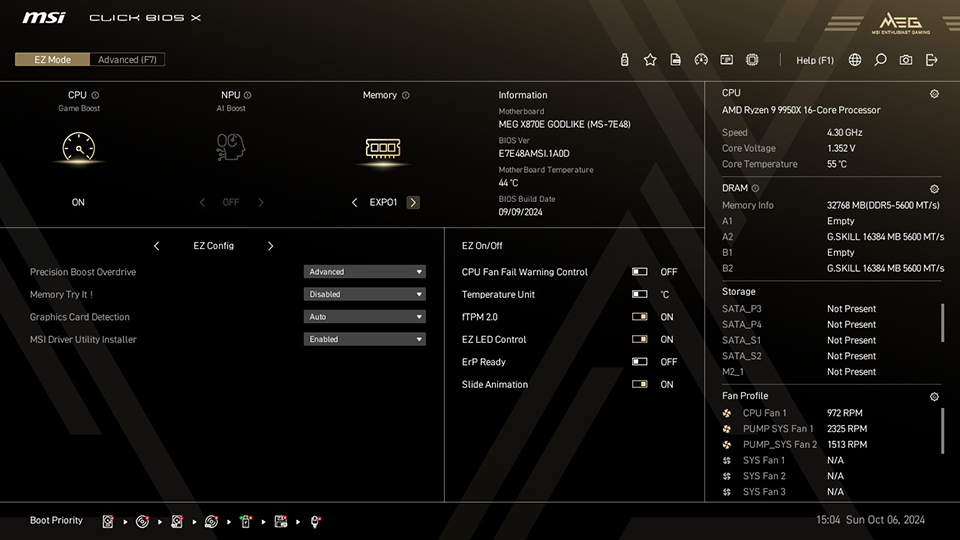
Of course, you can do a lot more in your BIOS, like performance optimization, overclocking and more. If you aren’t sure where to begin, a page with an overview of your BIOS features like this one is a great start.
PS. In case you don’t have access to your motherboard’s BIOS, you can find a troubleshooting guide here that may help you regain access to it.
Method 4: Using Manufacturer Software
If your motherboard comes bundled with some software from the manufacturer (like MSI Center from MSI), there’s an easy way to find the information you need about your motherboard within a simple User Interface. For this guide, we’ll use MSI Center as an example for MSI motherboards.
1. Install MSI Center from the official manufacturer website here.
2. Open the MSI Center application
3. Click the ‘Support’ tab at the top
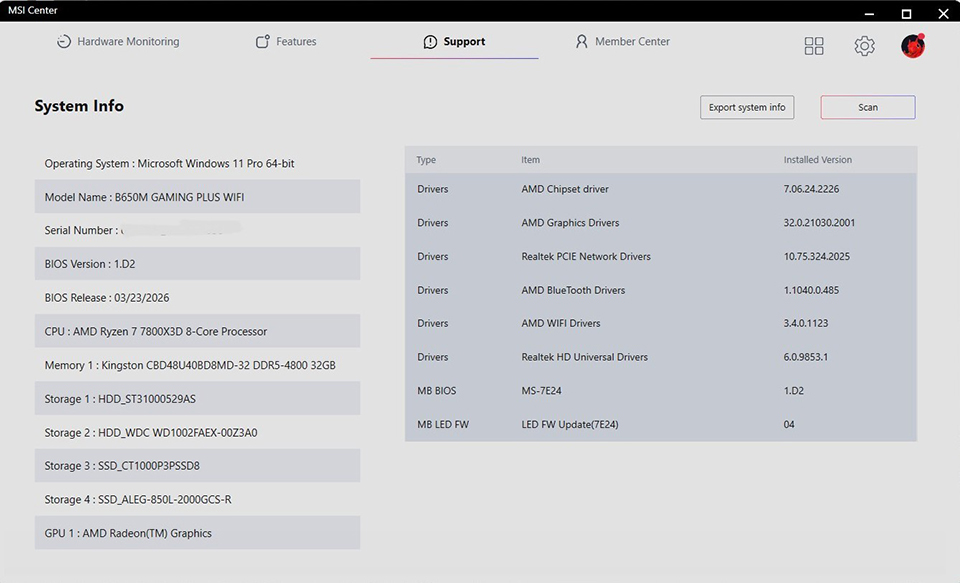
4. You’ll find your motherboard name and BIOS Version on this page
If you aren’t familiar with MSI Center, you can find more information about it in MSI’s support pages here.
Method 5: Using Command Prompt (CMD)
This next method is again meant for those using Microsoft Windows, but this one is by far the quickest way to find your motherboard’s manufacturer name, model name, and even BIOS details. That said, Microsoft has announced that it will be deprecating this method in future Windows 11 releases, so we recommend using the PowerShell method above.
1. Hit the start button and type ‘cmd’ and hit Enter. This should open a command prompt window. Note – You can also type ‘cmd’ within the Run (Win + R) window.
2. In the command prompt window, type the following command and hit Enter: wmic baseboard get product, manufacturer
3. You should see both your motherboard’s manufacturer name and its model name as shown in the screenshot below.
4. For BIOS version, use this instead: wmic bios get smbiosbiosversion
5. The text displayed below “SMBIOSBIOSVersion” is your BIOS version number.
6. If you need more details, like the release date of the BIOS currently installed, you can use systeminfo within command prompt. Type this and press Enter to see your BIOS version and its release date: systeminfo | findstr /I BIOS
How to Check CPU Compatibility After Identifying Your Motherboard
Once you have your motherboard model, you might want to check what modern CPUs you can grab as a drop-in upgrade for your PC. To check what processors you can install on your motherboard, you’ll need to head to your motherboard’s product page and look for the ‘Support’ option.

On this page, for most popular motherboard manufacturers, you should see a link for ‘Compatibility’. Once you click on that, you should see compatibility details for your motherboard. Look for the ‘CPU’ tab and then find the processor you want to upgrade to on that list.
If you find it listed there, good news! You can simply swap out your old processor (remember to update your BIOS to the latest version first) for the newer one.
However, if you don’t find it listed there, it means your motherboard doesn’t support it and you’ll have to hop to a more modern platform to upgrade to the processor you’ve been eyeing.
Ready for an Upgrade?
Once you’ve identified your motherboard successfully using one of the above methods and checked compatibility with any potential hardware upgrades, you’ll know whether your motherboard doesn’t support any newer hardware or it still has some life in it.
If it doesn’t support newer hardware, you have two options – spring for an upgrade or stick with your old hardware for a bit longer. For those leaning towards the former, we have motherboard buying guides for AMD Ryzen and Intel CPUs that will walk you through picking the right one for your next PC.
Newer motherboards tend to offer next-gen connectivity features, more bandwidth, higher speeds, and much more to enhance your gaming experience and supercharge your workflows.
You can learn more about how to pick the right motherboard for your gaming PC on our dedicated page here.